
09.12.2025
Blooming coffee is the essential first step of manual coffee brewing. You pour a small amount of hot water over your fresh coffee grounds. This releases trapped carbon dioxide (CO2).
This simple 30-45 second “pre-infusion” is the single most impactful technique to prevent sour, weak coffee. It unlocks the rich, complex, and sweet flavors hidden in your beans. Mastering the bloom is non-negotiable for anyone serious about brewing a truly delicious cup at home.
This comprehensive guide is designed for home coffee enthusiasts and pour-over beginners. We will move beyond the simple definition of what is blooming coffee to give you the science, the step-by-step method, and the expert troubleshooting tips you need. After reading, you will not only understand the process but will be able to confidently use it to dramatically improve your daily brew.
Table of Contents
The Science of the Bloom
To truly appreciate the bloom, we need to understand what happens to coffee beans after they are roasted. It’s a fascinating intersection of chemistry and physics that directly impacts the final taste in your cup.
The Role of Carbon Dioxide
When green coffee beans are roasted, a series of complex chemical reactions occur. Sugars and amino acids caramelize through the Maillard reaction and Strecker degradation. This develops the hundreds of aromatic and flavor compounds we love.
A significant byproduct of this intense thermal process is the creation and trapping of gases. Primarily carbon dioxide (CO2).
A freshly roasted bag of coffee is packed with this CO2. Over the days and weeks following the roast date, this gas slowly escapes. This process is called coffee degassing. This is why coffee bags have one-way valves. They let CO2 out without letting damaging oxygen in.
A large portion of a coffee bean’s mass right after roasting can be trapped CO2. This gas is a primary hallmark of freshly roasted coffee. The amount of CO2 is influenced by the bean’s origin, processing method, and the specific roast profile applied by the roaster.
How CO2 Ruins Extraction
While CO2 is a sign of freshness, it’s an enemy during the brewing process. Think of the bed of coffee grounds as a vast collection of tiny, porous sponges. Your goal is to have hot water evenly saturate every single particle. This extracts the delicious flavor compounds.
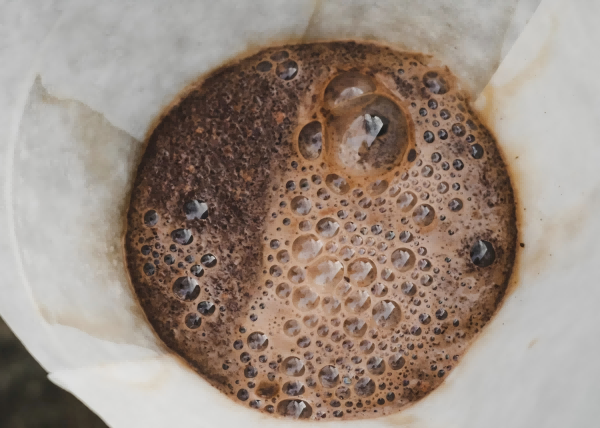
However, when hot water hits dry grounds full of CO2, the gas violently and rapidly expands and escapes. This creates a turbulent, bubbling effect. This is the “pour over coffee bloom” itself.
If you were to skip this step and pour all your brew water at once, a cascade of negative effects occurs.
First, there is physical repulsion. The escaping CO2 gas actively pushes water away from the coffee grounds. This prevents the water from properly wetting the coffee particles. This especially affects those in the center of the slurry.
Second, this leads to channeling. Water will always follow the path of least resistance. It will bypass the gassy, hydrophobic clumps of coffee. It carves “channels” through the coffee bed.
This creates a disastrously uneven extraction. The grounds directly in the path of these channels are over-extracted. They release bitter and astringent compounds. Meanwhile, the large portions of coffee that were bypassed by the water remain under-extracted. They contribute sour, grassy, and underdeveloped flavors.
The final result is an unbalanced and disappointing cup. Since much of the coffee was never properly extracted, the final brew will taste weak, thin, and often jarringly sour. You lose all the nuance and specialty coffee flavor you paid for.
The Bloom as Your Solution
The bloom is your elegant solution to this chaotic problem. By pouring just enough water to saturate the grounds, you trigger a controlled release of the majority of that CO2. Typically, this is double the weight of the coffee. This happens before the main brewing begins.
You can see it happening in real time. The coffee bed swells up like a muffin top. It bubbles gently and releases a wonderful, complex aroma. This is the coffee “breathing” and preparing itself for a perfect extraction.
Once this initial off-gassing is complete, usually after 30 to 45 seconds, the coffee bed settles. It is now fully saturated and degassed. Ready for the water to do its real work: dissolving flavor.
This degassing process is a fundamental concept in coffee chemistry. It’s discussed in depth by organizations like the Specialty Coffee Association (SCA) and validated by brewing experts and competitors worldwide. It is the foundation of any good pour over technique.
A Guide to Perfect Bloom
Now for the practical part. Follow these steps, and you’ll master the art of blooming coffee in no time. Consistency here will pay massive dividends in flavor.
What You Will Need
Before we start, let’s gather our tools. We have found through countless brews that precision is the key to repeatability. Great coffee is made, not just stumbled upon.
- Freshly Roasted Coffee: Beans roasted within the last 3 to 21 days are in their ideal window.
- A Quality Grinder: A consistent grind is absolutely essential for even extraction. A burr grinder is non-negotiable for serious brewing. If you’re looking for an upgrade, check out our selection of high-quality coffee grinders.
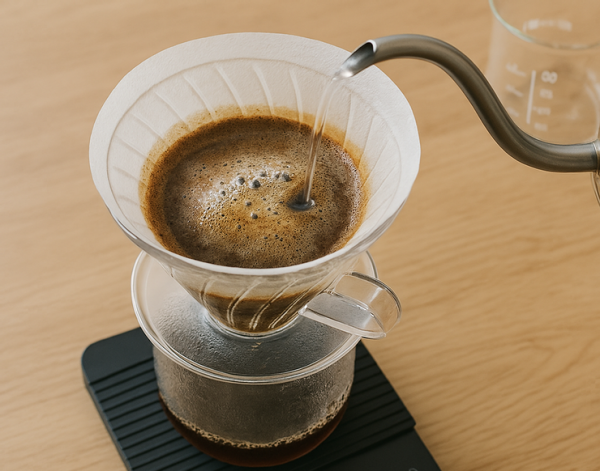
- A Gooseneck Kettle: The precise spout control is crucial for gently and evenly saturating the grounds. A standard kettle is too clumsy. A gooseneck kettle is a game-changer for pour-over.
- A Digital Scale: For measuring both coffee and water to the gram. Guessing is the enemy of great coffee.
- Your Brewer: (e.g., Hario V60, Kalita Wave, Chemex) and a paper filter.
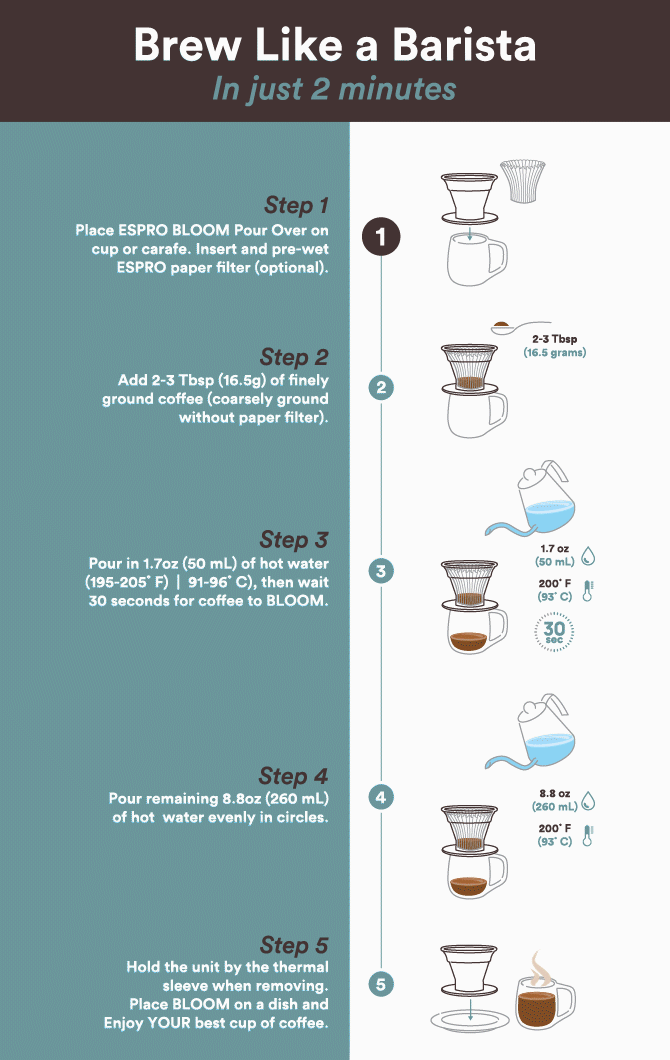
The 5 Steps to a Flawless Bloom
Let’s assume we are brewing a single 300g cup using 20g of coffee. This is a common 1:15 ratio.
- Prepare Your Grounds
- Place your brewer on your mug or server. Put it on the scale and tare it to zero. Add your 20g of freshly ground coffee. The grind should resemble coarse sand. Gently shake the brewer to create a flat, level bed of coffee. Tare the scale to zero again.
- Start the Timer and Pour
- Start your timer and immediately begin pouring the bloom water. The goal is to pour 2 to 3 times the weight of the coffee grounds. For our 20g dose, that means pouring 40g to 60g of water. Pour in a gentle spiral, starting from the center and moving outward. Ensure all grounds are evenly wet. Avoid pouring directly down the sides of the filter.
- Observe the Bloom
- You will see the coffee bed rise and bubble. This is the CO2 escaping. You’ll also be greeted with an incredible aroma. This is one of the best parts of the coffee-making ritual! The intensity of the bloom tells you a lot about the coffee’s freshness.
- Wait Patiently
- The bloom phase, or coffee bloom time, should last between 30 and 45 seconds. Do not rush this step. During this time, you can give the brewer a very gentle swirl to ensure all the grounds are saturated. Often just letting it sit is the best approach. You’ll know it’s ready for the next step when the bubbling subsides and the coffee bed stops expanding. It looks like wet sand.
- Begin Your Main Pour
- Once the bloom is complete, resume pouring your brew water according to your recipe. Pour in slow, concentric circles. Because you have properly degassed the coffee, the water will now be able to flow through the grounds evenly. It percolates gently instead of rushing through channels. This leads to a much sweeter and more balanced extraction.
Blooming Parameters at a Glance
Factor | Recommendation | Why It Matters |
Water-to-Coffee Ratio | 2:1 (e.g., 40g water for 20g coffee) | Ensures full saturation without starting the main extraction too early. Use a 3:1 ratio for very fresh roasts (1-4 days off roast). |
Bloom Time | 30-45 seconds | Allows most of the CO2 to escape. Too short and it’s ineffective; too long and you can lose delicate aromas and brew temperature. |
Water Temperature | 90-96°C (195-205°F) | Hot water is needed to effectively trigger the release of CO2 and begin dissolving flavor compounds. Use the same temperature as your main brew water. |
Pouring Technique | Gentle, controlled spiral | Ensures all grounds get wet evenly at the same time. A gooseneck kettle is invaluable for this precise application. |
Troubleshooting Your Bloom
Sometimes, your bloom won’t look like the perfect, bubbling dome you see in videos. Do not worry. This is a common part of the learning process. Here’s how to diagnose and fix the most common issues you might encounter.
Problem: “My coffee isn’t blooming!”
You pour the water, and… nothing happens. The coffee bed gets wet but doesn’t rise or bubble in any significant way.
The most likely cause is that your coffee is old.
As we discussed, coffee degassing is a continuous process. If the coffee was roasted many weeks or months ago, most of the CO2 has already escaped into the atmosphere. No CO2 means no bloom. The coffee is stale.
The solution is simple. First, always check the roast date. This is the number one fix. Buy coffee with a “roasted on” date printed on the bag, not a “best by” date. Try to use beans within one month of roasting for the best results. For an authoritative take on freshness, top roasters like Counter Culture Coffee emphasize the critical window after the roast date.
Second, always buy whole beans. Pre-ground coffee has a massively increased surface area. This means it degasses exponentially faster than whole beans. Grinding just before you brew is critical for preserving both the CO2 needed for a good bloom and the volatile aromatic compounds that create flavor.
Problem: “My bloom is huge and collapses fast.”
You pour the bloom water and the coffee bed erupts like a volcano. It falls completely flat within 15-20 seconds.
The most likely cause here is that your coffee is too fresh.
Coffee straight from the roaster (in the 1-3 day window) contains an enormous and highly volatile amount of CO2. This creates an overly aggressive bloom that can actually hinder proper saturation. It can even cause dry pockets to form.
The solution is patience. Do not be afraid to let your coffee rest for a few more days. Most specialty coffees hit their peak flavor profile between 5 and 14 days after roasting. This resting period allows the most volatile gases to escape. It makes the coffee easier to brew consistently.
For this very gassy coffee, use a 3:1 bloom ratio. For a 20g dose, use 60g of water for the bloom. This extra water helps to tame the aggressive off-gassing and ensure better saturation from the start.
You can also agitate the bloom. Give the slurry a gentle stir with a spoon or a swirl of the brewer right after you pour the bloom water. This helps release the trapped gas more evenly and ensures no dry clumps remain.
Problem: “I bloomed, but it still tastes sour.”
You followed all the steps, got a nice-looking bloom, but the final cup is disappointingly acidic, thin, and lacks sweetness.
The most likely cause is that your grind is too coarse.
Sourness is the classic sign of under-extraction. While the bloom helps prepare the coffee for even extraction, the water still needs to flow through it at the correct pace. If the grind is too coarse, water rushes through too quickly. It doesn’t have enough contact time to extract the sweet compounds (sugars, caramels) that balance the coffee’s natural acids.
The solution is to fine up your grind. Adjust your grinder to a slightly finer setting. This will increase the total surface area of the coffee and increase the resistance of the coffee bed. It slows down the flow of water. This leads to a higher, more balanced extraction. Make one small adjustment at a time and taste the results.
Also, check your water temperature. Water that is too cool (below 195°F / 90°C) can also lead to under-extraction. It is a less effective solvent. Ensure your kettle is at the proper temperature throughout the entire brew.
Advanced Blooming Techniques
Once you’re comfortable with the standard bloom and can consistently brew a good cup, you can start experimenting. Small changes to your bloom can have noticeable effects on the final cup. This is how you can further improve coffee extraction.
Agitated vs. Passive Bloom
A passive bloom is the standard method we outlined above. You pour the water and let the coffee degas on its own. It’s reliable, consistent, and a great starting point.
An agitated bloom is a more hands-on technique. Immediately after pouring the bloom water, you use a small spoon, a bamboo paddle, or even just the spout of your kettle to quickly and gently stir the slurry. The goal is to ensure every single particle is wet.
The main benefit is that it guarantees 100% saturation and can lead to a slightly higher and more even extraction. It’s particularly useful for very fresh coffee that is prone to clumping. It’s also good for coffees that are known to be difficult to extract evenly.
The potential downside is that agitation can sometimes lead to clogging the filter paper if done too aggressively. This happens if your grinder produces an excessive amount of fine particles. A gentle hand is key.
The Double Bloom Technique
This is a technique popularized in the coffee competition scene. It’s designed to maximize sweetness and clarity. Instead of one bloom, you do two.
First, perform a normal bloom with a 2:1 ratio (e.g., 40g water on 20g coffee) and wait about 30 seconds.
Second, add another small pulse of water (e.g., another 40-50g) and wait an additional 15-20 seconds. This acts as a second, smaller bloom or a gentle “pre-wetting” phase.
Finally, continue brewing with the rest of your water as normal.
The theory is that the first bloom releases the most volatile CO2. The second pour helps to fully saturate and stabilize the coffee bed before the main extraction phase begins. Many brewers find this leads to an exceptionally sweet and clean cup. It further reduces the risk of channeling. This is a great variable to play with when you’re trying to dial in a new coffee. This is a perfect technique to try with a curated selection of single-origin coffees, where highlighting delicate flavors is the goal.
The Final Brew
Understanding what is blooming coffee is the first step. But consistently practicing it is what will transform your daily brewing ritual. It’s not just a step in a recipe. It’s a conversation with your coffee. It’s the moment you take control of extraction to ensure you’re getting all the deliciousness the roaster and farmer intended.
Let’s recap the essentials.
The bloom’s purpose is to release trapped CO2 from fresh coffee. This prevents channeling and enables an even, balanced extraction.
The method is simple: use a 2:1 water-to-coffee ratio, pour evenly to saturate all grounds, and wait 30-45 seconds before starting your main pour.
The result is a sweeter, more balanced, and more flavorful cup of coffee. No more disappointing sourness or weakness.
The bloom is proof that small, intentional actions can have a massive impact on the final result. It costs you nothing but 45 seconds of patience and rewards you with a dramatically better cup. For a visual demonstration, experts like James Hoffmann offer excellent videos that can complement this guide and show the technique in action.
Furthermore, always remember that other variables are at play. Water quality is a key component. Using filtered water or a specialized solution like Third Wave Water can elevate your brew even further by providing the ideal mineral content for flavor extraction.
Now, go grab your favorite beans, and brew your best cup yet. You have the knowledge. Enjoy the process.
As a professional manufacturer specializing in the research, development, and production of Coffee machine accessories, we not only offer a diverse product selection but also support OEM/ODM customization to meet the needs of diverse markets and customers. With consistent quality control, fast delivery, and innovative designs, our coffee machines are used by numerous brands and channels worldwide. Whether you're a distributor, wholesaler, or brand owner, we can provide you with reliable solutions to help you grow your business. Contact us to explore potential collaboration opportunities.

Facebook
Twitter
LinkedIn
X
Categories: Coffee/Brewing Tips Product Knowledge