
18.11.2025
Want to brew a consistently perfect cup of pour-over coffee without a scale? Just remember this simple ratio: 1 tablespoon of coffee grounds ≈ 6–7 grams, and 180 ml of hot water is roughly 3/4 the volume of a standard mug.
Using a brewing ratio of 1:15–1:17, about 1.5–2 tablespoons of coffee grounds are sufficient for a 180 ml cup. Using only a common household spoon and cup, you can quickly prepare near-standard pour-over coffee without a scale.
Table of Contents
Why a Scale is the Gold Standard
Before we skip the scale, let’s understand why it’s so popular in coffee circles. Knowing what a scale does helps us copy its function with other methods. The main purpose of a coffee scale is perfect consistency.
The Quest for Consistency
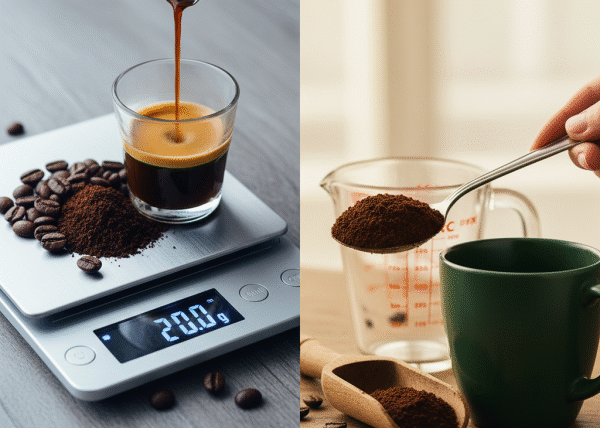
A scale provides gravimetric measurement—measuring by weight. This is the most accurate way to measure coffee.
Coffee beans aren’t uniform. Their size, shape, and density change dramatically based on origin, processing, and roast level. A scoop of light, dense Kenyan coffee weighs much more than the same scoop of dark, oily Sumatran coffee.
This difference is why weight is the professional standard. A scale ensures “15 grams” is always 15 grams, no matter the bean type. It lets a barista perfectly repeat a recipe every time.
This consistency helps achieve the Specialty Coffee Association’s (SCA) “Golden Ratio.” This accepted guideline suggests about 1 gram of coffee to 18 grams of water (1:18). A scale makes hitting this precise pour over ratio no scale effortless. You can learn more about these professional standards from the Specialty Coffee Association (SCA).
Embracing Volumetric Brewing
Now, let’s talk about our method: volumetric measurement. This means measuring by volume (scoops, tablespoons, cups) instead of weight.
Is it less precise? Yes. Does that mean bad coffee? Absolutely not. For decades, this was how almost everyone made coffee. The goal isn’t perfect, universal precision, but personal consistency.
Choose one measuring tool and stick with it. You create your own standard. Your scoop becomes your unit. Your mug becomes your water vessel. You’re building a repeatable system with the tools you have.
The most important judge of your coffee is your own taste. A recipe is just a starting point. Volumetric brewing lets you adjust based on flavor, creating a brew that’s perfect for you.
Measurement Type | Pros | Cons |
Gravimetric (Weight) | Extremely precise, repeatable, universal standard. | Requires a digital scale, can feel overly technical. |
Volumetric (Volume) | Accessible, intuitive, uses common tools, no extra cost. | Less precise, results can vary between different beans. |
Your No-Scale Toolkit
Mastering brewing coffee without equipment—or at least, without specialized equipment—is about being resourceful. Your kitchen already has perfect tools for the job. The key is choosing your tools and using them the same way every single time you brew.
Measuring Coffee Grounds
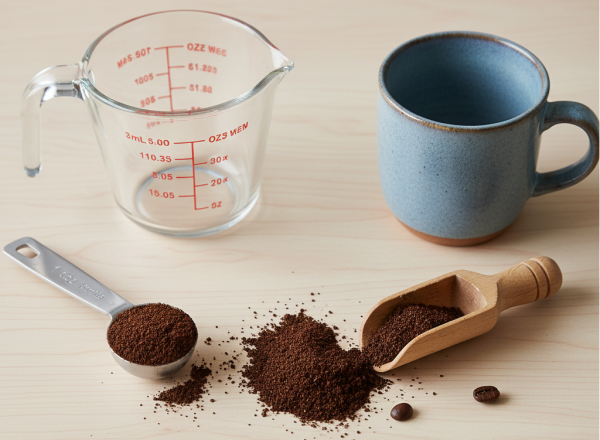
To estimate coffee grounds accurately without a scale, you need a reliable scoop. This becomes your personal measuring unit. Whether it’s a standard kitchen spoon or a dedicated coffee measuring scoop, consistency is the only rule.
A level scoop is a consistent scoop. Whatever tool you choose, fill it and use a straight edge, like the back of a knife, to level it off. This removes guesswork and is key to good tablespoon coffee measurement.
Here’s a breakdown of common tools and their approximate measurements for standard medium roast coffee. Remember, these are estimates. Your specific coffee’s density will cause slight variations.
Measuring Tool | Approx. Grams (Medium Roast) | Pro Tip |
Standard Measuring Tablespoon | 5-7 grams | Most common tool. Always level it off. Easiest starting point for any pour over for beginners. |
Standard Coffee Scoop (2 Tbsp) | 10-12 grams | Often included with coffee makers or bags. Fantastic and very consistent default tool. |
AeroPress Scoop | 11-14 grams | If you own an AeroPress, its scoop is deep, sturdy, and exceptionally consistent due to its shape. |
Bottle Cap (from a 20oz soda) | ~2-3 grams | Ultimate travel or camping hack. Surprisingly consistent. Roughly 3 level caps equals one tablespoon. |
Choose one of these, and only one. If you use a tablespoon today, use that same tablespoon tomorrow. This is how you build a repeatable recipe.
Measuring Water Volume
Measuring your water is just as important as measuring your coffee. This half of the coffee to water ratio by volume is often easier to eyeball, but technique helps.
The easiest method is using the vessel you plan to drink from. A standard kitchen mug typically holds 8 to 10 fluid ounces (about 240-300ml) when filled to normal level. This is perfect for single servings.
Our favorite pro tip: Before you start, fill the mug you plan to drink from with cold water up to your normal coffee level. Pour that water directly into your kettle. Now add just a bit more, maybe an inch.
This simple action does two things. First, it ensures you heat the perfect amount of water for your final cup. Second, the extra water is for pre-rinsing your paper filter, which is crucial for cleaner-tasting brew.
If you have a glass liquid measuring cup (like Pyrex), that’s an excellent and accurate tool for volumetric water measurement. Many electric kettles also have volume markers printed inside, perfect for this task.
Again, the principle is consistency. Whether you use your mug, a measuring cup, or kettle lines, use the same method every time to create a reliable pour over ratio no scale.
The Simple 5-Step Guide
Now we reach the heart of the process. This step-by-step guide uses sensory and visual cues rather than precise numbers. It’s about learning the rhythm and feel of good brewing. Let’s make coffee.
Step 1: Prep Your Station
A calm, organized brewing process starts with good preparation. It takes less than a minute but sets you up for success.
First, gather your gear. You’ll need:
- Your pour-over dripper (like a Hario V60, Kalita Wave, or similar)
- A paper filter that fits your dripper
- Your whole bean coffee and a grinder (if possible)
- Your chosen coffee scoop
- The mug you’ll drink from
- A kettle to heat water
- A timer (your phone’s stopwatch works perfectly)
Not sure which dripper is right for you? It can be confusing, but understanding the differences is key. If you’re exploring options, check out our guide to the Best Pour-Over Coffee Makers.
Place your dripper on top of your mug. Put the paper filter into the dripper.
Now, take some of that hot water you just heated and thoroughly rinse the paper filter. Pour enough to wet the entire filter, letting water drain into your mug. This rinse does two vital things: it washes away any paper taste from the filter and preheats your dripper and mug.
A warm vessel prevents “temperature shock,” where cold ceramic rapidly cools your brewing water, leading to under-extracted, sour-tasting coffee. Once water has drained through, discard this rinse water from your mug.
Step 2: The Good Enough Ratio
Here’s your starting point, a simple and memorable rule for your coffee to water ratio by volume.
The Golden Rule of Volume: Start with 2 level tablespoons of ground coffee for every 8 ounces (1 standard mug) of water.
This is a fantastic baseline that produces average strength coffee, similar to what you’d get at a good coffee shop. If you’re using the common 2-tablespoon coffee scoop, that means one level scoop per mug.
After you brew, you’ll adjust this to your taste. If the coffee is too strong, use slightly less coffee next time. If it’s too weak, add a bit more.
Now, it’s time to grind. The coffee grind size is arguably the most critical variable you can control. For most pour-over drippers, you’re aiming for consistency that resembles coarse sand or sea salt. It should feel gritty between your fingers, not powdery like flour.
Using a quality burr grinder makes a world of difference in your cup’s clarity and flavor. Consistent grind is crucial for even extraction. If you’re ready to upgrade from pre-ground or a blade grinder, explore our picks for the Best Burr Coffee Grinders.
Add your ground coffee to the pre-rinsed filter in your dripper. Give it a gentle shake to level the bed of grounds. You’re now ready to add water.
Step 3: Get Water Ready
You don’t need a digital thermometer to get your water temperature for coffee right. There’s a simple, time-tested method that works perfectly.
The Method: Bring your water to a full, rolling boil. As soon as it boils, remove it from heat. Let it sit for 30 to 45 seconds before you start pouring.
That’s it. This brief cooling period lowers water temperature from scorching 212°F (100°C) down into the ideal brewing range of 195-205°F (90-96°C).
Why is this temperature range so important? Water that’s too hot can scorch coffee grounds, extracting bitter and harsh flavors. Water that’s too cool fails to extract all the desirable sugars and acids, resulting in sour, weak coffee. This simple “boil and wait” trick lands you in the sweet spot for effective extraction without burning the coffee. To learn more about the science, check out this Perfect Daily Grind article on water temperature.
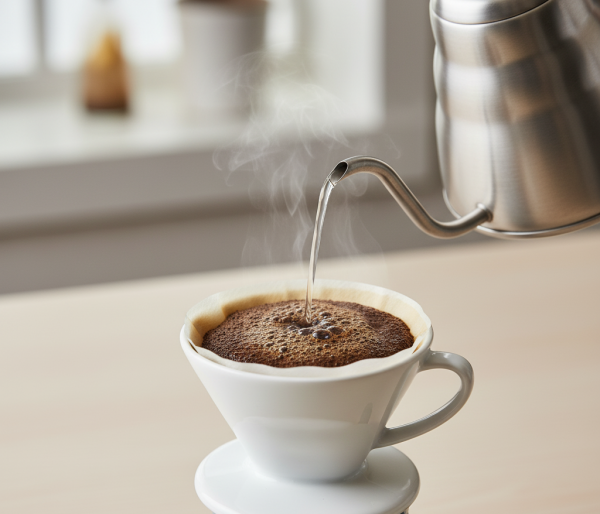
Step 4: The Sensory Pour
This is where the magic happens. Forget pouring exact gram amounts. Instead, focus on what you see, the time on your clock, and the rhythm of the pour.
The Bloom (0:00 – 0:45):
Start your timer and immediately begin pouring. Your first pour is the “bloom.” Gently pour just enough water to wet all coffee grounds. A good visual cue is pouring about twice the volume of water as there are grounds. You don’t need to measure this; just eyeball it.
As water hits fresh grounds, you’ll see the coffee bed swell up and bubble vigorously. This is the bloom, a beautiful and crucial phase where trapped carbon dioxide gas rapidly escapes from the coffee. It should look like a simmering, living thing. A dramatic bloom signals very fresh coffee.
Let the coffee bloom for about 45 seconds. This phase is critical for even extraction, as it allows water to penetrate grounds more evenly in the next stage. For a great visual guide, watch a master like James Hoffmann explain the bloom in this YouTube video.
The Main Pour (0:45 – 2:00):
After the bloom settles, it’s time for your main pour. The goal here is slow, steady, controlled water application.
Begin pouring in a gentle, circular motion. Start in the center of the coffee bed and spiral out towards the edge, then spiral back in. Think of it like watering a delicate plant; be gentle.
Try not to pour directly onto the paper filter itself. This can cause water to bypass coffee grounds and run down the dripper’s side, leading to weaker brew.
Your goal is maintaining consistent water level, keeping the dripper about half to three-quarters full throughout this phase. This creates gentle, consistent pressure that helps extract flavor evenly. Don’t dump all water in at once. Pour a little, let it drain a bit, then pour a little more, always in that slow, circular pattern. Continue this until you’ve used all water from your mug (which you measured earlier). This phase should take you to about the 2:00 mark on your timer.
The Drawdown (2:00 – 3:00):
Once all water has been poured, the final phase begins. This is the “drawdown,” where remaining water in the dripper drains through the coffee bed. There’s nothing to do here but watch and wait.
This final drawdown should complete somewhere between 2:30 and 3:30, depending on your specific coffee and grind size. When dripping slows to infrequent drops, your brew is complete.
Remove the dripper and set it aside. Look at the bed of spent coffee grounds. A flat, even bed signals good pouring and even extraction. If you see a deep crater in the middle or high walls of grounds left on the filter, it can indicate you poured too aggressively in one spot. This is all information for your next brew.
Troubleshooting Your Brew
Your first few cups without a scale might not be perfect, and that’s okay. Learning to brew by feel is a calibration process. Use your taste buds as your guide and this section as your map to fix any issues.
Weak or Watery Coffee
This is the most common issue for beginners. The coffee lacks flavor, body, and sweetness. It tastes thin and unsatisfying.
Likely Cause: Under-extraction. This means water passed through coffee too quickly, failing to pull out enough soluble flavor compounds.
Solutions (try these in order):
- Grind Finer: This is your most powerful tool. A finer coffee grind size increases surface area and provides more resistance, slowing water flow. This increases contact time and extraction. Try adjusting your grinder just one or two clicks finer.
- Add More Coffee: If your grind seems right, next adjust your pour over ratio no scale. Instead of 2 level tablespoons, try 2 heaping tablespoons, or 2.5 level tablespoons next time.
- Pour Slower: During the main pour, slow down your water stream. A gentler pour reduces agitation and can extend total brew time, giving water more time to work.
Bitter or Harsh Coffee
The opposite problem. The coffee has a dry, astringent, often burnt taste that lingers unpleasantly on your palate.
Likely Cause: Over-extraction. Water spent too much time in contact with coffee, pulling out unwanted, bitter compounds.
Solutions:
- Grind Coarser: This is the most effective fix. A coarser grind allows water to flow through the coffee bed more quickly, reducing total contact time and preventing extraction of those bitter flavors.
- Use Less Coffee: If your grind feels appropriate, try reducing your dose. Go from 2 level tablespoons down to 1.5, or ensure your scoops are perfectly level.
- Check Water Temperature: If you’re pouring water immediately off a rolling boil without waiting, it might be too hot. Try waiting a full 60 seconds after it boils before starting your bloom.
Brew Time is Off
Your total brew time is a great diagnostic tool. For a single mug (8-10 oz), a total time of 2:30 to 3:30 is a great target.
Too Fast (under 2 minutes): Your coffee will almost certainly taste weak and sour. The cause is nearly always a grind that’s too coarse. Water is simply gushing through grounds without any resistance.
Too Slow (over 4 minutes): Your coffee will likely taste bitter and muddy. This is a classic sign of a grind that’s too fine. Tiny coffee particles are clogging the paper filter, preventing water from draining properly. This “choked” brew leads to massive over-extraction.
Many professional roasters provide brewing guides that reinforce these time targets. For example, the principles in a guide like Blue Bottle Coffee’s pour-over guide often align with these time and taste diagnostics, confirming that total brew time is a key extraction quality indicator.
Is a Scale Worth It?
After mastering the art of how to make pour over coffee without a scale, you might wonder if you should ever bother getting one. The answer is: maybe.
A scale is not, and never will be, necessary for making truly delicious coffee at home. You’ve now learned the skills of observation and consistency, which are far more valuable than any equipment. You can brew a cup you love, and you can repeat it.
The moment a scale becomes powerful is when you want to elevate your hobby and explore the vast world of specialty coffee with scientific precision.
Imagine this journey: you’ve perfected your volumetric method. You know that 2 level tablespoons of your favorite Ethiopian coffee, ground at a certain setting, produce your perfect cup. But then you buy a new bag of dense, honey-processed Costa Rican coffee. You use your same 2-tablespoon scoop, but because this coffee is much denser, you’ve actually used more coffee by weight. Your brew tastes different, maybe a little too strong.
This is where a scale shines. It eliminates the variable of bean density. It allows you to dial in a recipe—say, 15 grams of coffee to 270 grams of water—and know you can replicate that exact recipe with any coffee bean in the world. It transforms you from a cook following feeling to a scientist repeating an experiment.
If you find yourself at this point, where you’ve hit volumetric brewing’s limits and your curiosity for precision is growing, then a scale is the logical next step. It’s a key that unlocks deeper experimentation. When you’re ready, our guide to the Best Coffee Scales for Every Budget can help you find the right one for your needs.
For an unbiased, third-party perspective, resources like Wirecutter’s review of coffee scales offer excellent, in-depth testing and recommendations, which can add another layer of confidence to your purchase.
The Joy is in the Brewing
You now know everything you need about how to make pour over coffee without a scale. You’ve learned that the true goal isn’t chasing an elusive, perfect number, but embracing consistency and trusting your senses.
Let’s recap the core principles:
- Choose one scoop for your coffee and one mug for your water, and stick with them.
- Start with a simple ratio of 2 level tablespoons of coffee for every 8-ounce mug of water.
- Use your senses to guide your pour, focusing on a gentle bloom and a slow, steady main pour.
- Trust your taste buds and adjust your grind size to fix any flavor issues. A finer grind for weak coffee, a coarser grind for bitter coffee.
The most important tool in your coffee-making arsenal is you. The process of pour-over is a ritual—a quiet moment to focus and create something wonderful with your own hands.
Pay attention to the process, enjoy the sights and smells, and trust your palate. Happy brewing.
As a professional manufacturer specializing in the research, development, and production of Coffee machine accessories, we not only offer a diverse product selection but also support OEM/ODM customization to meet the needs of diverse markets and customers. With consistent quality control, fast delivery, and innovative designs, our coffee machines are used by numerous brands and channels worldwide. Whether you're a distributor, wholesaler, or brand owner, we can provide you with reliable solutions to help you grow your business. Contact us to explore potential collaboration opportunities.

Facebook
Twitter
LinkedIn
WhatsApp
Categories: Coffee/Brewing Tips Product Knowledge