MILK TEXTURING · MICROFOAM · BARISTA GUIDE
How to Create Microfoam with a Coffee Milk Jug
Introduce a small amount of air while the milk is still cold, then keep the milk circulating until those bubbles become fine, glossy and fully integrated. This guide explains the jug position, steam-tip depth, temperature and fixes that make the process repeatable.
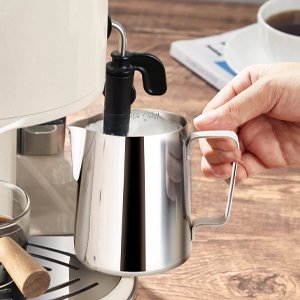
Quick answer: aerate first, then roll the milk
The useful target is not a tall cap of dry foam. Good microfoam looks glossy and wet, pours as one liquid, and has bubbles too small to stand out. If you hear loud screeching, harsh slurping or explosive splashing, adjust the tip depth rather than waiting for the milk to fix itself.
- Microfoam is a two-stage process: add air early, then integrate it through continuous circulation.
- Steam-tip depth is critical. Too deep only heats; too high creates large bubbles and spray.
- Leave enough headspace for expansion and enough milk depth to keep the tip stable.
- Use a thermometer while learning. Dairy and plant drinks can need different final temperatures.
- Swirl the pitcher after steaming and pour promptly so liquid milk and foam stay combined.
- Purge before steaming, then wipe and purge immediately afterward according to the machine manual.
| Signal | Correct result | Warning sign | Immediate adjustment |
|---|---|---|---|
| Sound during aeration | Short, gentle paper-tearing or kissing sounds | Harsh slurping, popping or splashing | Raise the jug slightly so the tip sits closer to the surface |
| Sound during rolling | Steady steam sound with little or no air intake | High-pitched screech with no circulation | Change depth or position until the full milk body moves |
| Surface | Glossy, reflective and wet | Dry, dull or covered with visible bubbles | Stop adding air sooner and lengthen the rolling phase |
| Pour | Milk and foam leave the spout as one integrated stream | Thin milk pours first and stiff foam drops out last | Swirl before pouring; reduce air on the next attempt |
What microfoam is—and what it is not
Microfoam is steamed milk containing many small air bubbles dispersed through the liquid. Milk proteins help form films around those bubbles. Steam also heats the milk and adds a small amount of condensed water. The final texture depends on milk composition, temperature, steam delivery, nozzle design and the way the milk circulates inside the jug.
Aeration
The steam tip meets the surface and pulls air into the milk. Baristas also call this stretching. For pourable microfoam, it should be controlled and usually completed early.
Integration
The tip moves below the surface and the milk continues rolling. Circulation distributes the entrained air and helps larger bubbles break into a finer, more uniform texture.
Heating
Steam raises the milk temperature throughout both stages. Starting cold gives you more working time before the milk reaches its target.
A 2022 peer-reviewed study found that bubble distribution, viscosity and foam stability changed with milk type, processing and steam-heating temperature. Under that study's conditions, pasteurized milk produced especially well-distributed bubbles around 60°C, and the authors identified an optimal final range of 50–60°C. Many practical machine guides use targets closer to 60–65°C for dairy. These figures are not contradictory universal rules; they describe different milk, machines, methods and desired serving results.
Set up the coffee milk jug correctly
The milk pitcher does not create microfoam by itself, but its diameter, wall, handle, spout and fill level affect how easily you can hold a stable vortex and feel the temperature change. A stainless steel frothing jug is the standard practical choice because it is durable, easy to inspect and responsive to heat.
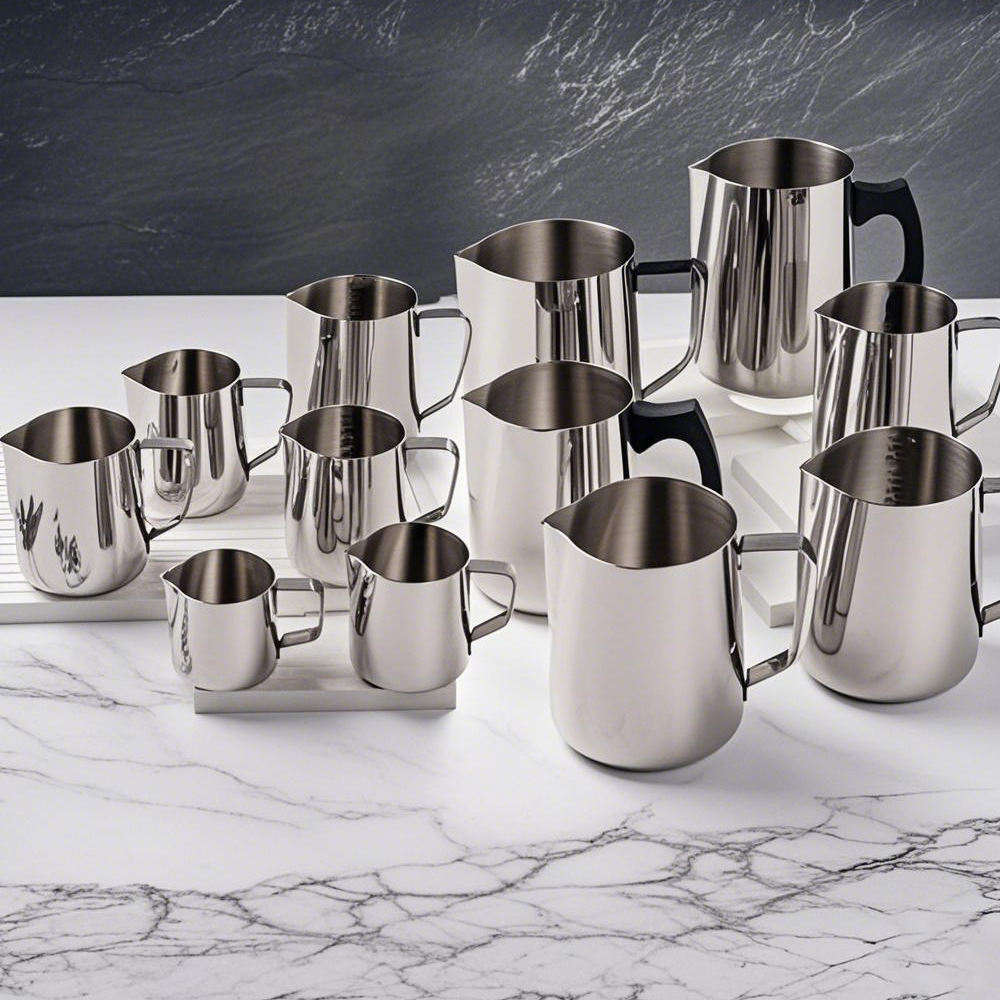
Choose a jug size that matches the drink
Use a pitcher that holds the starting milk plus expansion space without leaving the steam tip in a shallow puddle. A 350ml or 12oz jug is a useful starting point for one smaller drink. A 600ml or 20oz jug is often more practical for two standard drinks or one large drink. Cup size, milk ratio, steam power and expected expansion can change the best choice.
For a fuller decision path, compare Coffmach's milk frothing pitcher size guide and the dedicated guide to choosing a milk jug for two coffees.
Use a repeatable fill line
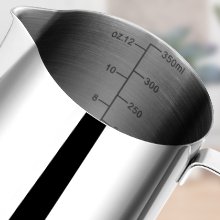
For many pitchers, a starting point near the lower base of the spout provides usable milk depth and room for expansion. Do not treat that visual landmark as a universal measurement; jug geometry varies. Mark or record the amount that produces the right finished volume for your cup and recipe.
Too little milk can make the steam tip difficult to control and may heat too quickly. Too much milk reduces headspace, slows circulation and can overflow as air is added. Internal volume marks help home users repeat a recipe and help cafés manage waste.
Start with cold milk and a cold, clean jug
Cold ingredients give you more time to introduce and integrate air before reaching the final temperature. Use the same milk, starting volume and refrigerator temperature while learning. This removes variables and makes position changes easier to understand.
Know the wand before steaming milk
Machines differ in steam pressure, tip-hole count, nozzle pattern and warm-up behavior. A technique that works on a low-power home machine may add air too quickly on a commercial machine. Read the machine manual, allow it to reach its specified steam-ready state, and practice small jug movements. Never touch the metal wand or direct steam toward skin.
How to make silky microfoam in seven steps
The following method is a starting framework, not a fixed timing recipe. Listen to the sound and watch the movement. The correct aeration time may be only a moment on a powerful machine and longer on a small single-boiler machine.
Coffmach's milk frothing pitcher guide covers the broader workflow from pitcher grip to pouring. For product sizes, handles, spouts and custom options, see the Coffmach Coffee Milk Jug range.

How much air should you add?
| Drink style | Air addition | Target texture | Pouring implication |
|---|---|---|---|
| Flat white | Low | Thin, glossy microfoam with minimal volume growth | Integrates closely with espresso; suited to fine lines |
| Latte | Low to moderate | Silky and fluid with enough body for a defined pattern | Balanced base and drawing control |
| Cappuccino | Moderate to higher | More volume, but still moist and integrated rather than dry | Broader white placement and fuller mouthfeel |
| Plant-based latte | Formula-specific | Glossy, stable texture without separation | Follow brand temperature guidance and test aeration gently |
Do not judge by a stopwatch until your machine, milk and starting volume are fixed. Use sound and finished volume to decide when to stop adding air. Then spend the rest of the steaming time integrating.
Microfoam troubleshooting: symptom, cause and fix
| Symptom | Likely cause | How to confirm | Corrective action |
|---|---|---|---|
| Large bubbles on the surface | Tip was above the surface or air entered too aggressively | Loud slurping, popping or splashing during the first stage | Expose less of the tip and use shorter, gentler air sips |
| Hot milk with almost no foam | Tip stayed too deep from the start | No paper-tearing sound and little visible expansion | Begin nearer the surface and introduce air before the milk warms |
| Dry foam sitting above thin milk | Too much air or weak integration | Liquid pours first; a stiff blob remains in the jug | Add less air, create a stronger top-to-bottom roll, swirl before pouring |
| High-pitched screech | Poor tip position, restricted circulation or blocked tip hole | Milk heats but the full body does not roll | Adjust depth and position; if unchanged, cool and inspect the tip per the manual |
| Milk spins flat without folding | Rotation exists but vertical circulation is weak | Surface rotates like a disc and bubbles stay near the top | Change jug tilt or tip position until milk folds through the center |
| Foam collapses quickly | Overheating, unsuitable milk, delayed pour or poor integration | Texture turns dull or separates while standing | Use colder milk, a lower verified target and pour promptly; test another milk |
| Milk splashes out | Tip is too high, jug is overfilled or steam is opened before positioning | Violent surface break at startup | Switch off safely, reduce fill, reset the submerged tip, then restart |
| Results change each time | Uncontrolled milk volume, temperature, steam setting or wand position | No repeatable starting recipe or measurement | Fix one baseline and change only one variable per attempt |
Why tapping cannot repair bad foam
A firm tap can release a few larger surface bubbles. It cannot turn a dry foam cap into integrated microfoam. If milk and foam have separated, swirling may briefly recombine them, but the long-term fix is less air and more effective circulation during steaming.
Why a clean steam tip matters
Partly blocked holes change the steam jets and can make a familiar position behave differently. Wipe the wand and purge it after every use as the manufacturer directs. If performance drops, allow the system to cool and follow the official tip-cleaning procedure. Do not improvise disassembly or touch a hot wand.
Dairy and plant milk do not foam the same way
Milk proteins stabilize air bubbles, while fat content, processing and temperature affect foam formation and drainage. In controlled research, changing fat or protein content altered steam-frothed foam behavior. This is why two cartons that look similar can produce different volume, gloss and stability.
Dairy milk
Whole milk often gives a creamy mouthfeel and flexible texture, while lower-fat milk may appear to foam more readily but can feel lighter. Pasteurized and UHT milk can both produce microfoam, yet processing can change stability and flavor. Keep the brand and starting temperature constant when learning before comparing milk types.
Oat, soy, almond and other plant drinks
Plant-based drinks vary more widely in protein type, fat, stabilizers, particles, acidity tolerance and heat response. A barista formulation may be easier to texture, but the label is not a guarantee. Start with modest air intake, keep the texture fluid, and follow the maker's maximum-temperature guidance. If it separates in coffee, test a lower final temperature and reduce the delay between steaming and pouring.
How to compare two milks fairly
- Use the same pitcher, starting volume, refrigerator temperature and machine state.
- Set one thermometer target appropriate to both products or run separate documented targets.
- Record finished volume, bubble visibility, gloss, pouring behavior and separation after a fixed observation period.
- Taste the milk alone and in the same espresso recipe; foam height alone is not a complete quality score.
- Repeat several times before changing the café recipe or wholesale recommendation.
How to choose a milk jug for better microfoam control
For home users
Start with one jug matched to your normal cup. Internal marks and a comfortable handle make repetition easier. Add a second size only when you regularly prepare a different number of drinks.
For cafés
Standardize two or three validated sizes, then define fill lines for each drink family. Buy enough identical pitchers to avoid switching geometry during busy service.
For brands
Specify capacity, usable volume, body dimensions, spout, handle, wall construction, marks and finish as measurable features—not only as a lifestyle image.
Milk pitcher features that affect the workflow
- Capacity and geometry: enough depth for the steam tip and enough headspace for expansion.
- Body diameter: compatible with the steam-wand length and the circulation pattern the machine can sustain.
- Spout: a rounder spout favors broader flow, while a sharper spout can support finer placement; neither creates microfoam.
- Handle: stable grip, finger clearance and a comfortable pouring angle when the jug is full.
- Wall and material: food-contact suitability, heat feedback, dent resistance, welding quality and cleaning compatibility.
- Measurement marks: visible, durable references that support recipe consistency and milk-waste control.
- Finish: durability, coating adhesion, stain visibility and compatibility with café cleaning procedures.
Develop a milk pitcher around the real steaming workflow
Coffmach offers ready-stock and custom coffee milk jugs across multiple capacities, with stainless steel options, measurement marks, spout and handle choices, colors, logos and retail packaging for café, wholesale and OEM/ODM projects.
B2B sample and RFQ checklist
- Target users, espresso machines, steam-wand geometry, drink sizes and expected daily volume.
- Nominal and usable capacity, fill references, top and base diameter, height, spout geometry and dimensional tolerances.
- Steel grade or other material, wall specification, rim finish, base stability, handle attachment and weld appearance.
- Logo method, coating or surface finish, measurement-mark process, artwork location and approved color sample.
- Cleaning chemicals and dishwasher expectations, corrosion check, coating adhesion and repeated-use test method.
- Golden sample, inspection plan, acceptable visual limits, packaging protection, barcode, instructions and traceability.
- Stock or custom quantity, sample plan, lead time, spare inventory, destination and compliance documents required for that market.
Review Coffmach's coffee milk jug product page before preparing the RFQ, then send the target recipes and machine details with the physical basket of requirements. Microfoam performance should be checked with the intended milk and steam system, not inferred from capacity alone.
Frequently asked questions
What is the easiest way to create microfoam?
Use cold milk, a correctly sized stainless steel jug and a repeatable starting fill. Add small sips of air only while the milk is cool, then move the tip slightly deeper and keep the whole milk body rolling until the target temperature. Swirl and pour immediately. Changing only one variable per practice attempt makes improvement much faster.
Where should the steam wand sit in a milk jug?
Begin with the tip just below the milk surface. Many baristas place it slightly off-center and tilt the jug because this makes circulation easy to see. The decisive points are vertical depth and full-body movement: near the surface for controlled air intake, then deeper for rolling without continued slurping.
What temperature is best for microfoam?
There is no single universal value. A peer-reviewed dairy study found favorable results around 50–60°C under its test conditions, while many practical machine guides use about 60–65°C for dairy. Plant drinks often need different limits. Use a thermometer, follow the milk and machine guidance, and choose the lowest repeatable temperature that delivers the desired taste and texture.
Why is my microfoam full of big bubbles?
The steam tip was probably too exposed or air was added for too long. Keep the tip closer to the surface so it makes gentle, short tearing sounds rather than loud slurps. End aeration earlier, move the tip deeper and maintain a strong rolling phase. Tapping can remove a few bubbles but cannot repair severely over-aerated foam.
Why does my milk heat without creating foam?
The tip is likely too deep, so steam heats the milk without drawing in air. Start with the tip barely below the surface and lower the jug only enough to hear controlled air intake. Add air before the milk becomes warm, then submerge slightly and continue rolling.
Can I make microfoam without an espresso steam wand?
You can create foam with a French press, handheld frother or automatic foamer, but the texture and workflow differ from steam-injected microfoam. Heat the milk separately within the product's safe instructions, add air in small amounts and integrate thoroughly. Choose the method that matches your drink and equipment rather than expecting identical results.
Is a 350ml or 600ml milk jug better?
A 350ml jug is usually easier for one smaller drink, while a 600ml jug is more versatile for two standard drinks or one large drink. The correct choice depends on starting milk volume, cup size, steam-wand length and required headspace. Use the smallest jug that still gives stable circulation and safe expansion room.
Should I tap and swirl milk after steaming?
Swirl every time to keep the foam and liquid integrated and restore a glossy surface. Tap only when a few visible surface bubbles need releasing. If the foam is dry, stiff or badly separated, tapping and swirling will not fully repair it; use less air and improve the rolling phase on the next attempt.
Can I re-steam leftover milk?
Do not build the workflow around re-steaming. Previously heated milk has already changed in temperature and foam structure, so the result is less predictable; repeated handling also creates hygiene and allergen-control concerns. Measure a closer starting amount and discard leftovers according to local food-safety procedures.
Technical sources and image credits
- Coffmach — Coffee Milk Jug. Internal product information on capacities, stainless steel options, measurement marks, handles, spouts and OEM/ODM customization.
- Breville — Microfoam Milk. Official guidance emphasizing texture before temperature, steam-wand purging and consistent practice with one milk.
- La Marzocco — How to Steam Milk. Official explanation of steam-tip position, controlled aeration and the difference between silky microfoam and denser foam.
- Barista Hustle — Making Microfoam. Technical training reference for early air entrainment, vertical tip position and the two-part microfoam process.
- International Dairy Journal — Effect of Steam Frothing on Milk Microfoam. Peer-reviewed study of milk processing, temperature, bubble distribution, viscosity, stability and sensory properties.
- Journal of Food Engineering — Production of Milk Foams by Steam Injection. Peer-reviewed research showing that steam pressure and nozzle design affect foam properties under the tested conditions.
- International Dairy Journal — Steam-Frothing of Milk for Coffee. Peer-reviewed study on evaluating foam and the effects of dairy fat and protein content.
- All article images are Coffmach internal product or workflow images from the Coffee Milk Jug product page. Each image is credited in plain text beneath it; neither the image nor its credit is clickable.