
28.10.2025
How to Choose the Perfect Coffee Tamper for Your Espresso: The Definitive 2025 Guide
You’ve bought a great espresso machine. You’ve found beautiful, freshly roasted beans. Yet your shots are hit-or-miss. Some taste amazing, others are sour or bitter.
The problem might be that flimsy plastic disc from your machine’s box. This is your stock tamper. It’s holding your coffee back.
A quality coffee tamper is small but powerful. It’s key to consistent shots, better flavor, and stopping channeling that ruins your coffee puck.
This guide will teach you everything. We’ll show you how to choose the perfect coffee tamper for your espresso. You’ll learn about size, material, different types, and proper technique. Transform your espresso from guesswork into precise craft.
Table of Contents
The Science of Tamping
Tamping has one goal: create a dense, level puck of coffee grounds in your portafilter basket.
This compact coffee bed provides even resistance against hot, high-pressure water from your espresso machine. When the puck is level, water flows through uniformly. It extracts flavor oils and solids evenly from all grounds.
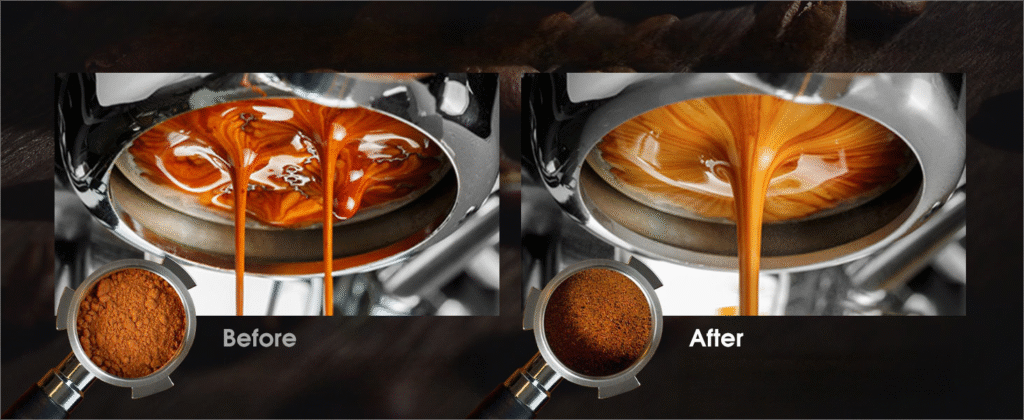
A poor tamp creates chaos. If the puck is uneven or cracked, water exploits these weak spots. This is channeling.
Water rushes through the easiest paths. It over-extracts some areas (bitter flavors) while under-extracting dense parts (sour flavors). You get one shot that’s sour, bitter, and weak all at once.
Uneven pucks also cause wildly different shot times. One shot might run in 15 seconds, the next in 40. Same dose and grind setting.
Think of building a sandcastle wall against the tide. A solid, evenly packed wall holds back water effectively. A wall with cracks crumbles instantly. Your coffee puck is that wall.
You may have heard about specific tamping pressure, often 30 lbs (about 15 kg). This is a common benchmark. But the exact number matters less than applying the same pressure every single time. Experts at Barista Hustle agree: consistency beats absolute force.
Mastering this step is crucial workflow. It bridges good grinding and great extraction. It’s a key skill for
dialing in your espresso shot perfectly.Anatomy of a Tamper
To choose the right tool, understand its parts first. We’ve broken down the coffee tamper into five key factors.
1. Size: The Most Critical Factor
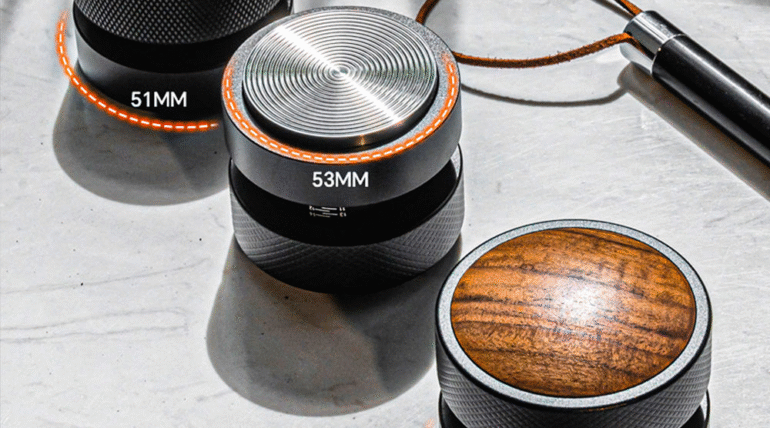
This is your most important decision. The tamper’s diameter must fit your portafilter basket as snugly as possible without sticking.
A too-small tamper leaves an un-tamped “ring” of coffee grounds around the basket’s edge. This loose ring becomes a superhighway for channeling. Water bypasses the dense puck and rushes through the sides.
Find your correct size by checking your espresso machine’s manual first. If it’s not listed, use digital calipers to measure your basket’s inner diameter. Or search online for your machine model and “portafilter size.”
Precision-machined baskets like VST or IMS often need more precise tamper sizes (58.5mm instead of standard 58mm). Always measure if you’re using aftermarket baskets.
Machine Brand | Common Portafilter Size | Recommended Tamper Size |
Breville/Sage (54mm series) | 54mm | 53.3mm – 53.5mm |
La Marzocco, Gaggia, Rancilio | 58mm | 58.3mm – 58.5mm (for VST/IMS) |
De’Longhi, Smeg | 51mm | 51mm |
Olympia Cremina | 49mm | 49mm |
We’ve seen the difference firsthand. On a Breville Barista Express, switching from the stock 53mm tamper to a precision-fit 53.3mm tamper immediately eliminated most side-channeling. Shots became more consistent. Flavors were noticeably sweeter and more balanced. That half-millimeter makes all the difference.
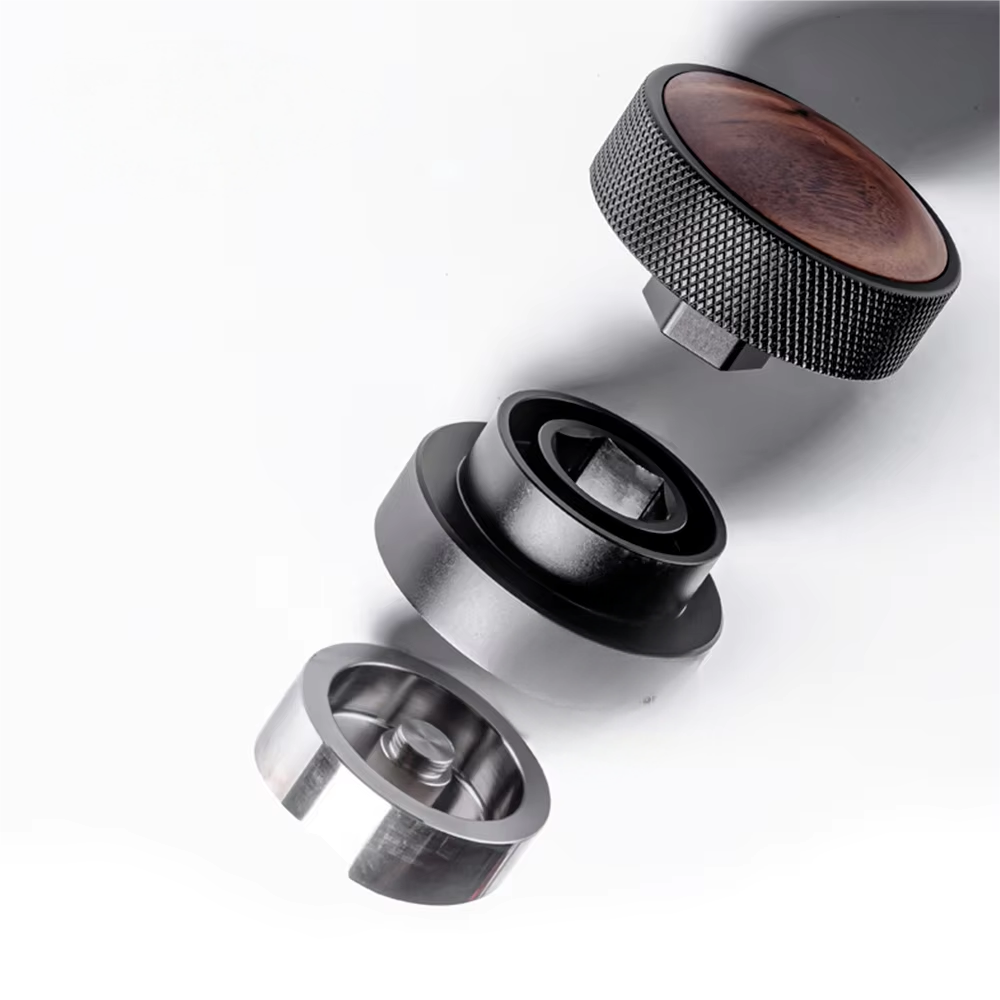
2. Base Shape: Flat vs. Convex
The base is your tamper’s business end. You’ll mainly see two shapes: flat and convex.
Flat bases are the industry standard. They create a perfectly level coffee bed from center to edge. For beginners, flat tampers make it much easier to feel if your tamp is level.
Convex bases have slightly curved bottoms. Either “Euro” curve (gentler) or “American” curve (more pronounced). Supporters believe this shape compacts grounds slightly more toward edges. This creates a better seal against the basket wall and potentially reduces side-channeling.
The extraction difference is subtle and often debated among professionals. For 99% of home baristas and most café settings, flat base tampers are most reliable and straightforward. We recommend starting with flat.
3. Material: Steel is King
The tamper base material affects weight, durability, and safety.
Stainless steel is the gold standard for good reason. It’s heavy and exceptionally durable. It won’t corrode or pit over time. It’s non-porous, making it easy to clean and hygienic. A polished stainless steel base provides smooth, frictionless tamping.
Aluminum is another common option. It’s much lighter than steel and can be anodized in various colors for custom looks. However, it’s softer metal. More susceptible to dents and scratches if dropped. This can impact your tamping surface’s evenness.
Avoid plastic entirely. Most consumer machine tampers are plastic. They’re too light to provide necessary force for consistent tamping without excessive effort. They feel cheap and damage easily. Upgrading from plastic tampers is the first and best step you can take.
4. Weight and Balance
Overall tamper weight is personal preference, but it functionally impacts your workflow.
Heavier tampers, typically over 400 grams, feel substantial in hand. Their mass does some work for you. Makes applying consistent pressure easier with less muscular effort. They often feel more “premium” and resolute as they sink into coffee.
Lighter tampers, 200-300 gram range, offer more tactile feedback. You feel the coffee puck’s resistance more directly. Many baristas prefer this. The tamper feels like a hand extension, allowing more nuanced control.
There’s no right or wrong answer. If you have wrist strain or prefer effortless motion, heavier tampers may be better. If you value feedback and control, lighter ones might be your preference.
5. Handle and Ergonomics
The handle is all about comfort and control. Since you’ll use this tool daily, it needs to feel good in your hand.
Handles come in various materials: classic wood, sleek metal, or modern composites. Shapes range from traditional “classic” or “barista” style, to simple ball handles, to more ergonomically sculpted designs.
Consider your hand size and tamping grip. Too-small or too-large handles can cause awkward grips and wrist strain. Especially if you’re making multiple espressos back-to-back. Comfortable handles encourage proper, repeatable motion.
A Deep Dive into Tamper Types
Beyond basic anatomy, tampers have evolved into several distinct categories. Understanding these types helps you choose the tool that best aligns with your goals. Whether that’s consistency, budget, or workflow efficiency.
The Standard Tamper
This is the classic, non-mechanical tool: a base fused to a handle. It’s the purest tamper form, relying entirely on user skill to achieve level and consistent tamping.
Pros: Generally most affordable, incredibly durable, and forces you to learn and master fundamental tamping skills by feel.
Cons: Your tamp consistency is 100% dependent on you. It’s easy to tamp unevenly or with varying pressure from shot to shot. Especially as a beginner.
Best For: Purists who enjoy manual espresso craft, those on tight budgets, or anyone looking to build strong manual skill foundations.
The Calibrated Tamper
A calibrated tamper is a game-changer for consistency. It incorporates a spring mechanism within the handle. This clicks, releases, or gives way when pre-set pressure is reached (most commonly 15, 25, or 30 lbs).
Pros: This design removes tamping pressure guesswork. Ensures you apply the exact same force every single time. Critical for repeatable results. Excellent training tools and perfect for households with multiple users.
Cons: More expensive than standard tampers. Users can develop false security. The tool only calibrates pressure, not levelness. You can still apply 30 lbs pressure to an uneven tamp.
Best For: Home espresso enthusiasts seeking ultimate consistency, beginners wanting to eliminate a key variable, and training new baristas in café settings. High-quality examples like the Normcore V4 Tamper have become standard for home users.
The Distribution Tool / Leveler
This tool isn’t technically a tamper, but it’s critical for modern puck preparation. A distribution tool, or leveler, has a base with small fins or wedge shape. You rest it on your grounds and spin it.
The purpose is grooming coffee surface before tamping. Ensures grounds are evenly distributed across the entire basket. This breaks up clumps and fills gaps, creating a flat, homogenous surface for tamping.
Pros: Dramatically improve coffee bed evenness. This is the number one defense against channeling. Very easy to use and adds consistency to your routine.
Cons: Distribution tools don’t compact coffee; they only groom the surface. You still need a tamper afterward to create necessary density (unless you buy combination tools with levelers on one side and tampers on the other).
Best For: Absolutely everyone serious about reducing channeling and achieving sweet, even extractions. This tool has become almost non-negotiable for high-end espresso.
The Automatic Tamper
These are tamping technology’s pinnacle. Automatic tampers, like the well-known Puqpress, are electronic devices. They provide perfectly level and consistent tamping with button pushes or by simply placing portafilters into machines.
Pros: Deliver unparalleled consistency in both levelness and pressure. Completely remove human error from the equation. Incredibly fast, which hugely benefits busy commercial environments.
Cons: Very expensive and have much larger countertop footprints than manual tools.
Best For: High-volume specialty coffee shops where speed and absolute consistency are paramount. Or prosumers for whom budget is no object. Watching expert reviews like James Hoffmann’s can highlight professional applications.
Tamper Type Comparison
Tamper Type | Consistency | Skill Required | Price Range | Best For |
Standard Tamper | Low-Medium | High | $ | Budget-conscious beginners, purists |
Calibrated Tamper | High | Low-Medium | $$ | Home enthusiasts, training |
Distribution Tool | High (Levelness) | Low | $$ | Everyone seeking to reduce channeling |
Automatic Tamper | Very High | None | $$$$ | High-volume cafes, ultimate prosumers |
Your Practical Tamping Guide
Knowing theory is one thing; putting it into practice is another. Here’s a step-by-step guide to achieving perfect tamping. More importantly, how to troubleshoot your shots by looking at evidence left behind.
The 4 Steps to a Flawless Tamp
Follow this simple process for better, more consistent pucks every time.
- Distribute. After grinding coffee into the portafilter, grounds will be clumpy and uneven. Use a Weiss Distribution Technique (WDT) tool. This can be a dedicated tool with fine needles or even a simple straightened paperclip. Stir the grounds. This breaks up all clumps and creates light, fluffy, and homogenous beds.
- Level. Gently tap the portafilter’s side with your hand to settle grounds into relatively flat beds. For even better results, use distribution/leveling tools as described above. Creates perfectly planar surfaces. This step is critical.
- Tamp. Place your tamper on the grounds’ surface. Before applying pressure, ensure it’s perfectly level. Use your thumb and index finger to feel the tamper rim relative to the basket rim. Once level, press down firmly and evenly. Remember, the goal is consistent pressure you can repeat, not a specific number. Don’t worry about over-tamping; focus on being level.
- Polish (Optional). Some baristas finish with gentle, non-pressurized tamper spins on the puck’s surface. This “polishing” does very little, if anything, for extraction quality. But it creates beautiful, smooth finishes. It’s an aesthetic choice.
This entire puck preparation process comes after you’ve dialed in your dose and grind size from your
espresso grinder.Reading the Used Puck
After pulling your shot, don’t just knock the puck out. Inspect it. The spent puck is a report card telling you what happened during extraction.
- If you see cracks or fissures in the puck… this often means the portafilter was bumped or tilted after tamping but before brewing. Fracturing the puck. Can also happen if dry pucks sit in groupheads too long before extraction begins.
- If you see soupy, wet pucks… this usually signals your dose was too low for basket size. Leaving too much headspace. Or your grind is too coarse, preventing proper seals.
- If you see small holes or pinpricks… this is the tell-tale channeling sign. You found the “channel” where water drilled through weak spots. The cause was almost certainly poor distribution or uneven tamping. This cues you to focus more on WDT and leveling steps.
The Specialty Coffee Association (SCA) provides detailed protocols on what constitutes proper extraction. Avoiding these puck failures is fundamental to meeting those standards.
Our Top Recommended Tampers
Based on criteria we’ve discussed, here are our curated recommendations. These are tools we trust to deliver performance, quality, and value for every type of home barista. Pairing one of these with a great
home espresso machine will dramatically elevate your coffee game.Best for the Budget-Conscious
The LuxHaus Calibrated Tamper
This tamper is a fantastic starting point. It offers the immense benefit of calibrated 30lb springs at very accessible price points. The base is solid stainless steel. Provides consistency that standard stock tampers simply cannot.
Best for the Home Enthusiast
The Normcore V4 Spring-Loaded Tamper
The Normcore V4 is arguably the gold standard for serious home baristas. It features calibrated springs (with interchangeable options) and self-leveling plates. This ingenious design ensures your tamping is perfectly level every single time. Solves for both pressure and levelness in one tool. It’s a massive upgrade for shot consistency.
Best All-in-One Tool
The Crema Coffee Products Distributor/Tamper Combo
For those who value workflow efficiency, this two-in-one tool is brilliant. One side is an adjustable-depth distribution tool to perfectly level your grounds. The other side is a solid, heavy-weight tamper. It’s an elegant and highly effective solution that streamlines your puck prep.
The Ultimate “Endgame” Tamper
The Force Tamper
This is a tool for perfectionists. The Force Tamper is an innovative calibrated tamper that doesn’t rely on users’ steady pushes. Instead, it has unique punch mechanisms that deliver pre-set, instantaneous impacts. This design eliminates any variables from users’ downward force. Ensures perfectly repeatable and level tamping. Its engineering reflects the kind of deep research into extraction dynamics seen in academic settings like the UC Davis Coffee Center. Focuses on minimizing all possible variables.
Your Investment in Consistency
We’ve journeyed from understanding why your tamping matters to intricate tamper anatomy details. We’ve explored different available types, perfected tamping techniques, and reviewed some of the best market tools.
Remember, choosing the right coffee tamper isn’t about spending the most money. It’s about making smart investments in the right tools for your goals.
It’s about eliminating variables. Taking control of your extraction. Building routines that deliver delicious, balanced, and consistent espresso. Every single time.
Now, go choose your perfect tamper and unlock the next level of your home espresso.
As a professional manufacturer specializing in the research, development, and production of coffee machines, we not only offer a diverse product selection but also support OEM/ODM customization to meet the needs of diverse markets and customers. With consistent quality control, fast delivery, and innovative designs, our coffee machines are used by numerous brands and channels worldwide. Whether you're a distributor, wholesaler, or brand owner, we can provide you with reliable solutions to help you grow your business. Contact us to explore potential collaboration opportunities.

Facebook
Twitter
LinkedIn
WhatsApp
Categories: Uncategorized