Barista Guide · Pitcher Selection · OEM/ODM
Best Latte Art Pitcher Spout: Round vs Sharp
A practical guide to milk flow, line definition, pattern choice, fair testing, troubleshooting, and production-ready pitcher specifications.

Round vs Sharp Spout: The Quick Answer
For most beginners and everyday cafe service, a controlled round latte art pitcher spout is the best all-round starting choice. It normally supports a moderate, forgiving stream for hearts, stacked tulips, and broad, high-contrast patterns. A sharp, pointed, or narrow spout becomes more useful when the goal is precise placement, finer lines, rosettas, wing tulips, swans, or drag-and-draw details.
Neither shape is automatically superior. The spout influences the final part of the flow path, but microfoam quality, pouring height, flow rate, pitcher fill, cup geometry, and the barista's motion still determine what appears in the cup.
Key Takeaways
- Choose a round spout for forgiving medium flow, bold white areas, hearts, stacked tulips, and general service work.
- Choose a sharp or narrow spout for focused flow, fine-line separation, exact entry points, and complex pattern control.
- Spout labels are not standardized. Tip opening, projection, lip radius, crease, top angle, alignment, and pitcher size all matter.
- A precision tip cannot rescue dry, bubbly, separated, or over-aerated milk. Uniform, fluid microfoam comes first.
- For OEM or wholesale buying, approve a dimensioned drawing and a functional golden sample, then inspect repeatability across production units.
Round vs Sharp Spout: Quick Comparison
| Decision factor | Round spout | Sharp or narrow spout | Practical implication |
|---|---|---|---|
| Typical stream | Moderate, broader, relatively forgiving | Focused, narrower, sensitive to small movements | Test the finished pitcher, not the label alone |
| Easiest patterns | Monk's head, heart, stacked tulip, bold wing base | Rosetta, fine wing tulip, swan, combination pours | Pattern families overlap for skilled users |
| Learning feel | Clear feedback and easier volume building | Greater placement precision with a smaller timing window | Beginners often progress faster with controlled medium flow |
| Line style | Medium-to-broad white lines and fuller shapes | Fine separated lines and narrow finishing cuts | Flow, height, and movement still change line width |
| Main limitation | Can feel less exact for very fine detail | Can underfill broad shapes or feel twitchy with thick foam | Match the tool to the pattern and milk texture |
| Commercial role | Versatile service and training pitcher | Specialist or advanced-pattern option | Many cafes benefit from keeping both profiles |
Short answer: Buy a round spout first if you are learning or need one dependable cafe pitcher. Add a sharp or narrow spout when your milk is consistently silky and line placement—not steaming or basic flow control—is the limiting factor.
Real Pitcher Details to Inspect
Product photos are useful for screening visible features, but they cannot prove stream behavior by themselves. Use these Coffmach product examples to identify the areas that deserve closer inspection, then confirm dimensions and pouring performance with a physical sample.
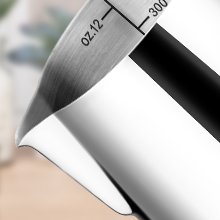
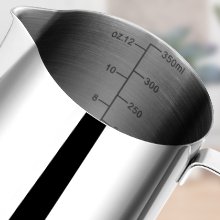
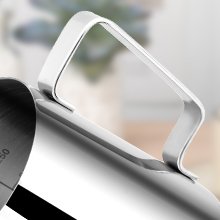
Official product imagery: Coffmach Coffee Milk Jug.
What Do Round, Sharp, Narrow, and Eagle-Beak Mean?
Milk-pitcher vocabulary is inconsistent. One brand may call a profile “sharp,” another “narrow,” and another “precision.” Sellers may also use “eagle beak,” “needle nose,” or “pointed spout” for a long projecting tip. These are market descriptions, not standardized dimensions. Compare geometry and stream behavior before comparing names.
Round spout
A round spout has a curved outlet and usually a softer transition from the rim into the pouring lip. It commonly supports a moderate continuous stream that grows predictably as the pitcher tilts. Round does not necessarily mean wide or imprecise; a compact round outlet can still produce controlled medium-width lines.
Sharp or narrow spout
A sharp profile converges toward a defined tip. The outlet may be narrow, projected, lipped, or supported by a front crease. These features can focus the stream, but the trade-off is sensitivity: a small wrist movement, abrupt tilt, or thick foam can change the stream quickly.
Eagle-beak or tapered spout
This usually describes a longer projecting tip with a defined downward lip. It may be useful for drag-and-draw work, combination pours, and exact finishing lines. It sits on the same geometry continuum as other sharp spouts; it is not a separate performance standard.
The spout is more than its tip
The opening, projection, lip radius, edge finish, front crease, top angle, left-right symmetry, body centerline, and handle or grip reference combine to determine how the pitcher releases milk.


Real manufacturer product photos are shown as model-specific examples. Compare opening profile, projection, lip finish, crease, top angle, and centerline alignment on the physical sample.
The Specialty Coffee Association's KIMERA product entry illustrates this continuum: WPM #06 is described as a versatile round spout, #07 as a narrow spout for finer lines, and #08 as a tapered high-precision spout for intricate combination pours. This is a useful model-specific example, not a universal classification or an SCA performance standard.[2]
How Spout Geometry Changes Milk Flow
The spout guides the last part of the flow path. As the pitcher tilts, the milk level rises toward the outlet. The body, rim, crease, and lip shape the stream before it detaches. A narrower effective exit can focus the stream; a rounder opening can release a broader sheet or ribbon. A pitcher is not a fixed-flow nozzle, however—the barista continuously changes tilt, height, position, and speed.
A simple relationship is Q = A × v, where Q is volumetric flow rate, A is the effective stream cross-sectional area, and v is average stream velocity. This helps explain why a small effective area can create a fine stream, but it cannot predict latte-art performance from tip width alone. Pitcher angle, liquid head, viscosity, foam fraction, surface tension, outlet geometry, and hand motion all change the effective flow.
Pouring height determines whether milk mixes or draws
During filling, a higher stream helps milk penetrate the surface and mix beneath the crema. During drawing, the spout moves close enough for the milk-and-foam emulsion to remain visible. Barista Hustle describes drawing height as less than about 1 cm above the beverage surface and explains how flow rate changes line width.[3] Spout shape matters, but height and flow control decide when white foam appears.
Milk level changes the response
A fuller pitcher has more liquid head and weight; once tilted, it may accelerate toward the spout quickly. A nearly empty pitcher may require a steeper angle and can expose separated foam near the end. This is why the same spout may feel fast at the beginning of one pour but thin and slow during another. Match pitcher capacity and starting milk volume to the cup.
Foam rheology can overwhelm the design
Microfoam is a moving mixture of liquid and air bubbles. If it is too dry, bubbles and liquid do not travel together cleanly. If it is too thin, white detail may sink or spread. If it rests too long, drainage and separation change the pour. Peer-reviewed research shows that milk composition, processing, foaming conditions, viscosity, bubble-size distribution, and stability all affect the resulting foam.[6][7] A sharp tip may reveal these faults sooner, but it does not cause or correct them.
Why Choose a Round Spout?
A round spout is usually the safer first choice because it supports continuous, readable flow. It gives enough volume to build a white base without demanding exact alignment at every moment, making it useful for learning how tilt, cup position, and flow affect the design.
- Builds medium or broad white areas efficiently for hearts and tulip layers.
- Supports pushing and continuous-flow movements without starving the pattern.
- Usually remains manageable when the user's flow rate varies slightly.
- Works well when cafe speed, repeatability, and readable contrast matter more than microscopic detail.
- Provides an accessible baseline for teaching placement, cutting, and cup leveling.
Limitation: a broad outlet can place more milk than intended in a small working area and may make the final cut feel thicker. First try reducing flow, lifting slightly, using an appropriately sized pitcher, and improving milk fluidity. If fine-line placement remains the consistent bottleneck, add a narrower spout.
Why Choose a Sharp or Narrow Spout?
A sharp or narrow spout becomes useful when the barista can already produce repeatable microfoam and wants more control over where the stream lands. A focused outlet can separate individual lines, support a narrow finishing stroke, and place details inside a crowded design.
- Focuses the stream for precise entry points and smaller surface areas.
- Supports fine-line rosettas, wing tulips, swans, hanging elements, and combination pours.
- Makes the relationship between small hand movements and line placement more immediate.
- Can produce a narrow cut without adding excessive milk at the end of a design.
A sharp crease is not the same as a narrow tip. Fellow's Eddy development account describes a deep front crease and fluted spout intended to create more consistent, intuitive flow, while also acknowledging a faster pour. The example shows why the entire front geometry matters: a visibly sharp pitcher can still pour quickly.[9]
Limitation: a narrow outlet can make thick foam bunch up and release abruptly. It can also encourage hesitant, low-flow pouring. A dramatic silhouette is not proof of precision; check body balance, handle position, lip finish, and alignment.
Which Spout Fits Each Latte Art Pattern?
| Pattern or task | Useful starting spout | Why | Technique priority |
|---|---|---|---|
| Monk's head or solid heart | Round | Moderate flow builds one clean white mass | Get close, increase flow smoothly, then lift and cut |
| Stacked tulip | Round or medium-narrow | Needs volume plus repeatable start-stop control | Keep pushes centered and leave room for later layers |
| Ripple heart | Round or narrow | Either works when movement matches flow | Maintain symmetry and finish with a clean cut |
| Traditional rosetta | Narrow or controlled round | Focused flow can separate leaves; round flow can make fuller lobes | Coordinate wiggle, forward movement, and flow |
| Wing-base tulip | Round for bold wings; narrow for finer feathers | Line style changes with the desired base | Use fluid foam and keep the spout near the surface |
| Swan or combination pour | Narrow, sharp, or tapered | Precise placement helps fit multiple elements | Plan entry points and preserve milk for the final neck and cut |
| High-volume cafe service | Round or medium profile | Repeatability and speed often matter more than extreme detail | Standardize milk dose, cup, and core pattern |
Judge the cup, not the label. The 2026 World Latte Art Championship evaluates visual and technical output rather than awarding points for a particular pitcher-spout name. For purchasing and training, repeatable results are more useful than copying a competitor's equipment silhouette.[1]
Variables That Matter More Than the Spout Label
- Microfoam quality. Compare spouts with the same milk, starting temperature, aeration, rest time, and swirl routine. Otherwise, the test mostly compares foam batches.
- Pitcher capacity and starting fill. A 350 ml / 12 oz pitcher and a 600 ml / 20 oz pitcher change liquid head, weight, tilt range, and distance from milk level to outlet.
- Cup diameter and wall shape. A wide rounded cup gives more working surface and lets the spout approach the liquid; a narrow or steep-sided cup reduces the working area.
- Handle, grip, and balance. A handle offers repeatable indexing; a handleless body allows free rotation. Neither is inherently more precise. Subminimal, for example, offers handled and handleless versions around the same FlowTip concept.[10]
- Alignment and edge finish. An offset or twisted spout can encourage a curved or double stream. A rough edge can make milk cling, drip, or release inconsistently.
How to Test Round and Sharp Spouts Fairly
Use a controlled A/B session instead of judging two pitchers from one successful or failed pour. The goal is to find the tool that gives more repeatable results with your milk, cup, machine, pattern, and hand.
- Choose pitchers with similar capacity and use the same cup model. If capacity differs, dose milk so working fill is comparable.
- Use the same milk lot, starting temperature, espresso recipe, steam wand, final milk target, and rest time.
- Pour one simple pattern, such as a heart, and one line-dependent pattern, such as a rosetta. Alternate pitchers to reduce learning and fatigue bias.
- Record several pours from the same camera position. Note starting milk mass, leftover milk, drips, broken streams, and whether the design filled the intended area.
- Score repeatability—not the single best cup. Useful criteria include symmetry, contrast, line separation, centering, clean cut, and ease of stopping flow.
- Repeat on another day. Select the spout that remains predictable and keep a second profile only if it offers a meaningful specialist advantage.

Three useful practice drills
- Flow ladder: pour a safe cold practice liquid onto a scale at low, medium, and high tilt to learn how quickly each outlet responds.
- Dot placement: place equal dots at the center, left, and right of a practice canvas to isolate entry-point control.
- Line-width ladder: pour three short white lines from broad to fine by changing flow and height. A useful pitcher provides a controllable range, not only one line width.
Troubleshooting Spout-Related Pour Problems
| Symptom | Likely cause | How to confirm | Corrective action |
|---|---|---|---|
| Two streams or sideways pull | Crooked spout, asymmetric lip, dried milk, off-axis tilt | Test with water; inspect head-on; rotate grip independently | Clean the lip; correct grip; reject a visibly misaligned sample |
| White blob instead of lines | Foam too dry, flow too fast, or too much volume | Swirl and retry at lower flow; compare a narrower outlet | Reduce aeration, pour sooner, or use a more focused outlet |
| Pattern stays tiny | Flow too slow, spout too high, or sharp outlet used cautiously | Move to drawing height and increase flow progressively | Commit to a stronger push; use a rounder profile while learning |
| Lines fade below the surface | Spout too high or milk too thin | Observe whether white appears only when the tip gets close | Tilt the cup, lower the spout, and improve microfoam texture |
| Stream starts late, then surges | Low fill, foam separation, projecting tip, or abrupt tilt | Compare immediately after swirling at standardized fill | Use the right pitcher size, pour promptly, and roll into the tilt |
| Cut line is too thick | Too much flow during the finish | Lift higher and reduce tilt before cutting | Use a lighter finish or a narrower spout if the problem remains |
How to Choose for Your Use
Home-barista beginner
Start with a balanced 350–450 ml pitcher and a controlled round or medium spout. Learn glossy, fluid microfoam and a centered heart before adding a competition-style tip.
Intermediate learner
Keep the round pitcher and add a narrow model of similar capacity. Alternating between them reveals whether the limitation is the tool or the technique.
Busy cafe
Prioritize repeatable dosing, durable construction, easy cleaning, handle comfort, and a versatile medium-flow spout. Keep specialist pitchers for trained staff or premium presentation.
Training or competition practice
Maintain matched capacities with round, narrow, and tapered profiles. Label by measurable geometry, video the same drill, and score repeatability.
For dairy and plant-based menus, test every important beverage with the intended spout. Plant beverages can vary substantially in protein, fat, stabilizers, viscosity, and drainage, so one internal test should not be generalized across formulations.
OEM and Wholesale Buying Guide
For a brand or distributor, “round” and “sharp” are not complete specifications. Convert the desired pouring behavior into controlled drawings, approved samples, and repeatable inspection methods. The commercial objective is consistency: production units should match the centered stream and hand feel approved during development.
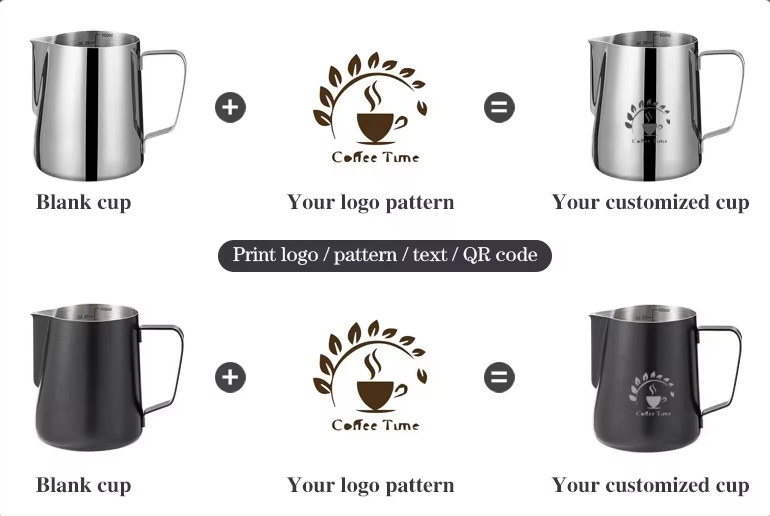
From pour geometry to a market-ready SKU
Coffmach's current product page presents ready-stock capacities from 100 to 1500 ml and customization for size, material or finish, color, measurement marks, logo application, and retail packaging.[11] These options should be treated as a capability overview: confirm the exact grade, wall thickness, geometry, finish process, order quantity, production schedule, and destination-market documentation in the project quotation.
For branding, the page describes options including laser marking, stamping, engraving or etching, screen printing, transfer processes, and stickers. Select the process only after testing legibility, placement, cleaning durability, and its clearance from food-contact and pouring surfaces.
Official Coffmach product image; click the image to open the product landing page.
Geometry to define on the drawing
- Overall capacity, usable fill references, body diameter, height, and taper.
- Spout projection, opening width and profile, lip radius, and front-crease depth.
- Spout centerline relative to the body and handle or grip reference.
- Top-rim angle, spout elevation, and left-right symmetry.
- Material grade and thickness, interior finish, exterior coating, and food-contact surfaces.
- Handle position, clearance, weld locations, and approved balance at normal working fill.
Prototype and golden-sample approval
Approve appearance and function separately. A polished sample can still pour poorly, while a good stream can come from a sample with unacceptable burrs or weak welds. Retain a signed golden sample, dimensioned drawing, material and finish references, packaging standard, and functional-pour record. If more than one pitcher size uses a similar spout, test every size because body volume and outlet proportion change the response.
Practical incoming or pre-shipment checks
| Characteristic | Suggested method | Pass logic | Why it matters |
|---|---|---|---|
| Spout dimensions | Gauge or fixture against the approved drawing | Within project-defined tolerances | Geometry drift can change stream focus and release |
| Centerline and symmetry | Front-view fixture or image overlay | No offset or twist beyond approved limit | Reduces sideways or double streams |
| Lip and edge finish | Visual and tactile check under good light | Smooth, clean, free of burrs or coating intrusion | Supports clean release, cleaning, and safe handling |
| Water stream screening | Defined fill, tilt fixture, and capture target | Centered continuous stream without abnormal drip or split | Quickly identifies gross alignment defects |
| Milk functional test | Approved recipe, cup, operator protocol, and coded sample | Meets agreed pattern and repeatability criteria | Confirms performance in intended use |
| Handle and weld | Visual check plus project-defined load or cycle test | No looseness, cracking, sharp weld, or unacceptable distortion | Protects durability and pouring balance |
| Markings and finish | Artwork, adhesion, cleaning, and color comparison | Matches approved artwork and durability method | Prevents branding and dose-control complaints |
Water testing is useful for screening alignment and release, but it does not replace a milk test. Water lacks the bubbles, viscosity, drainage, and surface behavior of microfoam. Define sample size, tolerances, test cycles, food-contact documentation, and destination-market compliance for each project.
RFQ checklist for a custom latte art pitcher
- Target customer, skill level, service volume, and primary latte-art patterns.
- Desired line style: bold, medium, fine, push-and-flow, or drag-and-draw.
- Spout category plus dimensioned geometry—not only a reference photo.
- Pitcher capacity, milk dose, cup range, body shape, and handled or handleless preference.
- Material declaration, wall thickness, internal finish, coating, and target-market documents.
- Logo process, measurement marks, color standard, artwork position, and packaging.
- Golden-sample approval, functional-pour protocol, inspection level, defects, and report format.
- Order quantity, destination, labeling language, carton requirements, schedule, and replacement policy.
Coffmach project brief: Send the intended capacity, cup size, round or sharp profile, sample or drawing, handle style, material and finish requirements, measurement marks, logo, packaging, quantity, destination market, and the latte-art test the sample should pass. See Coffmach's custom coffee milk jug manufacturing options or its private-label sourcing guide.
Common Buying and Training Mistakes
- Assuming sharper always means more professional. Professional performance means repeatable results in the intended workflow.
- Comparing spouts with different milk texture. A dry first batch and fluid second batch make the second pitcher look better regardless of geometry.
- Ignoring pitcher size. A 300 ml narrow pitcher and 600 ml wide pitcher differ in weight, fill, liquid head, and tilt range.
- Buying from a front photo only. Request top, side, and front views, dimensions, a physical sample, and a controlled pour video.
- Treating one perfect pour as proof. Judge a sequence of pours, several users when relevant, and both simple and complex patterns.
- Modifying a finished spout with pliers. Bending can create sharp edges, cracks, coating damage, asymmetry, or an unrepeatable outlet. Change the drawing and tooling instead.
Frequently Asked Questions
Is a round or sharp milk pitcher spout better for beginners?
A controlled round or medium spout is usually better for beginners. It provides enough flow to build hearts and tulips while making changes in tilt easy to see. Add a narrow pitcher when consistent microfoam is no longer the main limitation and line placement becomes the goal.
Which pitcher spout is best for rosettas?
A narrow or sharp spout is a useful starting choice for fine-line rosettas because it focuses placement and can separate leaves. A round spout can produce a fuller, bold rosetta. Fluid microfoam, close drawing height, coordinated wiggle, and forward movement remain decisive.
Can a round spout pour a swan?
Yes. A skilled barista can pour a swan with a controlled round spout. A narrow or tapered spout may make the neck, head, and detailed placement easier, especially in a small cup, but the pattern is not locked to one tool.
What is an eagle-beak milk pitcher?
An eagle-beak pitcher generally has a long projecting pointed spout, sometimes with a downward lip or strong front channel. The term is descriptive and not standardized. Compare the opening, projection, top angle, and actual stream behavior.
Does a sharp spout automatically make thinner lines?
No. A sharp outlet can focus the stream, but line width also depends on flow rate, pouring height, foam texture, milk level, cup geometry, and hand movement. A sharp spout at high flow can create broad lines, while a round spout used carefully can create fine ones.
Why does my milk pitcher pour two streams?
The lip may have dried milk, a burr, asymmetry, coating intrusion, or a twisted spout. The pitcher may also be tilted off its centerline. Clean the lip, test with water, inspect it head-on, and compare another unit if the split remains.
Does pitcher capacity change how the same spout feels?
Yes. Capacity changes body diameter, milk level, weight, liquid head, and the angle needed to reach the outlet. A similar-looking spout on a 300 ml and 600 ml pitcher may not produce the same response.
Which spout works best with oat or other plant milk?
There is no universal answer because plant beverages vary in protein, fat, stabilizers, viscosity, and drainage. A round profile may help build volume with thicker foam, while a narrow profile may improve placement with a fluid barista formulation. Test the actual beverage and recipe.
Is a handleless pitcher more precise?
Not automatically. Handleless pitchers allow free rotation and direct body grip; handled pitchers offer repeatable indexing and thermal separation. Precision depends on balance, temperature comfort, alignment, and the user's grip.
What should an importer inspect on a sharp-spout pitcher?
Inspect dimensioned geometry, symmetry, centerline alignment, lip smoothness, coating boundaries, stream release, handle position, weld quality, markings, and consistency across units. Approve a functional golden sample and define tolerances and a test method.
Technical Sources
- 2026 World Latte Art Championship Rules and Regulations — current official competition rules and evaluation framework.
- Specialty Coffee Association: KIMERA by Slow Pour Supply — model-specific round, narrow, and tapered spout descriptions.
- Barista Hustle: The Second Half — training reference for drawing height, flow rate, and line width.
- Barista Hustle: The First Half — filling height, continuous flow, and common pouring faults.
- Barista Hustle: Latte Art Recap and Glossary — pouring terminology and technique definitions.
- International Dairy Journal: Effect of Steam Frothing on Milk Microfoam — milk composition, texture, stability, and organoleptic properties under steam frothing.
- LWT: Effects of Manufacturing Conditions on Foamed Milk — processing conditions, foam stability, bubble size, and sensory characteristics.
- Slow Pour Supply: WPM Pitcher Collection — official model-specific pitcher and spout descriptions.
- Fellow: The Making of the Eddy Steaming Pitcher — manufacturer account of crease geometry, spout form, and flow behavior.
- Subminimal: FlowTip Milk Jug — handled and handleless formats using the same precision-spout concept.
- Coffmach: Coffee Milk Jug — current product imagery and supplier-listed capacity, material, marking, logo, finish, and packaging customization options.