
28.10.2025
You’ve bought a quality espresso machine. You’ve found great coffee beans. Maybe you even upgraded your grinder. You’re close to making café-quality coffee at home.
But your shots are all over the place. Sometimes they taste bitter and watery. Other times they barely drip from the portafilter.
The missing piece might be a small but powerful tool: the coffee tamper. So, what is a coffee tamper and how to use it to unlock your espresso’s full potential?
A coffee tamper is a tool that presses coffee grounds into a tight, even puck inside your espresso machine’s portafilter basket. This single step is one of the most important things you can control when making espresso.
This guide is for everyone from curious beginners to aspiring home baristas. We’ll explain what a coffee tamper is and why it matters. You’ll learn how it works, how to pick the right one, and how to use it properly.
By the end, you’ll see why this simple tool is essential for making delicious, consistent espresso.
Table of Contents
Why a Tamper is Non-Negotiable
To newcomers, a coffee tamper might seem optional. After all, can’t you just press the grounds down with a spoon or your fingers?
The answer is no. The reason lies in how espresso extraction works.
Using a proper coffee tamper is essential for three key reasons.
1. Creating Proper Resistance
An espresso machine forces hot water through coffee grounds at high pressure. This pressure is typically around 9 bars, or 9 times the atmospheric pressure at sea level.
For this to work, the water needs something to resist it. A properly tamped puck of coffee provides this resistance.
This forces the water to soak the grounds evenly. It extracts all the good flavor compounds—sugars, oils, and acids.
Without a dense puck, water would rush through too quickly. The result is a weak, sour shot that’s under-extracted. This is often called a “gusher.”
2. Ensuring an Even Flow
The goal is uniform extraction. Every coffee particle should give up its flavor at the same rate.
A coffee tamper with a flat, precisely-made base compresses the entire coffee surface with equal force.
This creates a puck with the same density from edge to edge. Water flows through it evenly.
An uneven bed, created by using a finger or spoon, leads to uneven extraction. This creates a shot with confusing flavors—both sour (under-extracted) and bitter (over-extracted).
3. Preventing Channeling
Channeling is the enemy of good espresso. It happens when water finds the easiest path through the coffee puck. Think of a tiny river carving a canyon.
These channels form from cracks, gaps, or soft spots in the puck. Without proper tamping, these problems are almost guaranteed.
When water channels, it bypasses most of the coffee. It aggressively over-extracts the grounds directly in its path.
You’ll see it: The espresso stream will be pale and watery. It often spurts messily from the portafilter spouts.
You’ll taste it: The shot will be weak, sour, and intensely bitter all at once. It’s the worst possible outcome.
Correct tamping creates a solid, stable puck that resists channeling. This forces water to flow through all the coffee for balanced, delicious extraction.
Anatomy of a Coffee Tamper
While simple in function, coffee tamper design is deliberate. Understanding its parts helps you see how it works and what to look for when buying one.
The Handle
This is where you grip the tamper. Its main job is providing a comfortable, secure hold. This lets you apply pressure without strain and with good form.
Handle materials vary widely. You’ll find polished wood, anodized aluminum, stainless steel, and durable plastic. The choice often comes down to looks, feel, and weight balance.
Shape matters for comfort too. From classic rounded knobs to ergonomic “puck” style handles, the shape should fit your hand well. It should promote a straight, vertical tamping motion.
The Base (Piston)
This is the working end of the tamper. It makes direct contact with coffee grounds and does the compression.
The base should be made from heavy, food-safe material. Stainless steel is the gold standard. It’s heavy, durable, and easy to clean. Its weight helps create a more stable tamp. Its durability prevents nicks and scratches that could disrupt the coffee bed.
Aluminum is lighter and more affordable. But it’s more likely to get damaged over time.
Base shapes are typically flat or convex. A flat base is the industry standard. It promotes an even bed from edge to edge. We recommend this for all beginners.
A convex, or slightly curved, base can help seal the puck edges. This may reduce side-channeling. But it can make achieving a perfectly level bed harder for new users.
The Connection
The handle and base can be one solid piece or two parts screwed together.
A screw-on design allows customization. You can pair different handles with different bases. Maybe you want to upgrade a handle for better comfort or change base sizes if you get a new machine.
The Science of Tamping
Why is tamping pressure so important? The answer lies in how density, water flow, and extraction time work together.
When you tamp, you reduce space between coffee grounds. This increases the overall density of the puck.
Density and Porosity
A denser puck is less porous. This means it’s harder for water to pass through. This is exactly what we want.
By controlling density through tamping, you control water flow rate. The goal is achieving a specific flow rate that allows for ideal extraction time.
For a standard double shot of espresso, this time is typically 25 to 30 seconds.
If you tamp too lightly, the puck isn’t dense enough. Water flows through too quickly, often in less than 20 seconds. The result is an under-extracted, sour shot.
If you tamp too hard, or your grind is too fine, the puck becomes too dense. Water struggles to get through, or “chokes” the machine. The result is an over-extracted, bitter shot that takes 40 seconds or more to pull.
Ideal Tamping Pressure
The long-standing industry standard is 30 pounds (about 13.6 kg) of pressure. Organizations like the Specialty Coffee Association (SCA) often cite this figure.
This provides a reliable benchmark for training. A classic exercise for new baristas is practicing tamping on a bathroom scale. This teaches what 30 pounds of pressure feels like.
However, modern coffee theory emphasizes consistency over a specific number.
As long as you tamp hard enough to fully compress the grounds and do it the same way every time, you can adjust your grind size to dial in the shot.
This is where calibrated tampers shine. They click at a preset pressure and can be invaluable for beginners seeking shot-to-shot consistency.
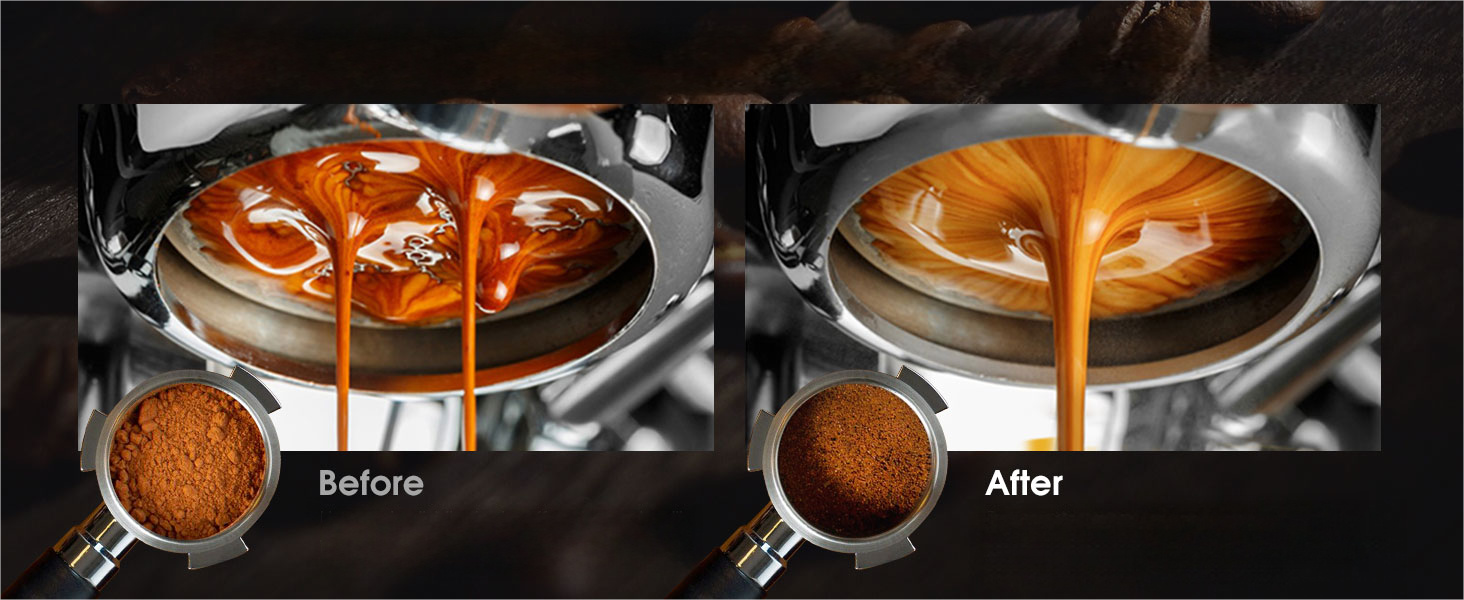
How Tamping Affects Extraction
Proper tamping directly impacts the Total Dissolved Solids (TDS) and Extraction Yield (EY) of your espresso. These are the scientific measures of a shot’s strength and flavor.
A well-formed, uniformly dense puck allows for higher, more even extraction. This leads to richer, more complex, and sweeter flavor.
Scientific studies on coffee extraction confirm that uniform particle bed density is critical for achieving repeatable, high-quality brews. For those interested in the deep science, research papers on platforms like ScienceDirect explore the complex fluid dynamics at play.
Types of Coffee Tampers
The market offers several different tamper styles. Each is designed to help with consistency and ease of use. Understanding them helps you find your perfect match.
Classic (Manual) Tampers
This is the most common and traditional type. It consists of a simple handle and base. They are simple, elegant, and effective.
Their performance relies entirely on the user’s skill to apply even and consistent pressure. They are the true workhorse of the coffee world, from home setups to high-end cafes.
They come in a vast range of materials, weights, and handle designs. You can find everything from basic, functional models to beautifully crafted artisan tools from renowned makers like Reg Barber.
Calibrated Tampers
A calibrated tamper is a game-changer for anyone struggling with consistency.
These tampers have an internal spring mechanism that “clicks” or gives way once a preset pressure is reached. This is usually 30 lbs.
This completely removes guesswork from tamping pressure. It ensures you apply the exact same force every single time you make coffee.
They’re an excellent choice for beginners, training environments, or anyone who values repeatable results above all else.
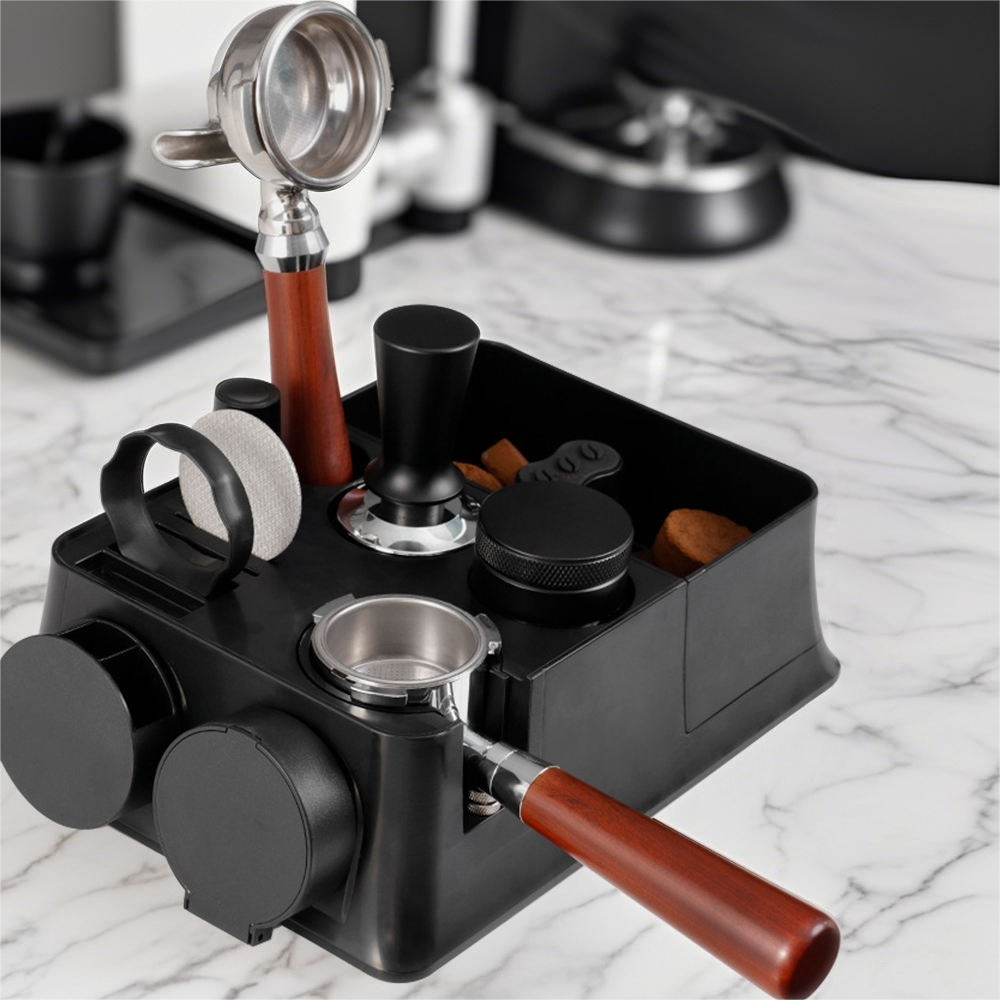
Palm Tampers & Distribution Tools
These tools have a different form factor. They look more like a metal hockey puck than a traditional tamper.
A palm tamper is held in your palm. Its depth is often adjustable, letting you set how far it compresses the coffee. The idea is that by resting the tool’s collar on the portafilter rim, you ensure a perfectly level tamp every time, regardless of how you hold it.
It’s important to make a distinction here. Many tools that look like palm tampers are actually distribution tools. A distribution tool, or leveler, has a finned or wedge-shaped base. It’s designed to groom the top layer of coffee before tamping to ensure even density across the surface.
A palm tamper has a flat base for final compression. Many baristas use a distribution tool first, followed by a traditional or calibrated tamper to complete puck preparation.
Puck Rakes / WDT Tools
While not technically a tamper, this tool is a crucial partner in the tamping workflow.
A WDT (Weiss Distribution Technique) tool uses fine needles to break up clumps and evenly distribute coffee grounds in the portafilter before tamping.
This simple act dramatically reduces channeling risk. Many professional and home baristas consider it essential for high-quality espresso.
We highly recommend using a WDT tool as part of your puck preparation routine. It creates a fluffy, uniform foundation that makes your tamp far more effective.
Choosing Your Tamper
With the options clear, how do you choose the right one? Focus on these four key factors.
1. Size Matters Most
This is the single most critical factor. An incorrectly sized tamper will undermine all your efforts.
A tamper that’s too small will leave an un-tamped “ring” of coffee around the basket edge. This loose coffee becomes an instant superhighway for water, causing massive channeling and a terrible shot. A tamper that’s too large simply won’t fit.
You must measure your basket’s inner diameter. Use digital calipers for an accurate reading. Don’t rely on manufacturer’s generic specifications (e.g., “58mm machine”). The actual inner diameter of baskets can vary.
Common sizes include:
- 58mm: This is standard for most commercial and prosumer machines from brands like La Marzocco, Rocket, and those with E61 group heads. A 58.5mm tamper is often preferred for a snug, “precision” fit in these baskets.
- 54mm: This size is common on many popular Breville/Sage home espresso machines. If you own one of these, you need a specific 54mm tamper.
- 51mm: This size is often found on many entry-level De’Longhi and other consumer-grade machines.
A quality tamper is one of the most important accessories for your espresso machine.
2. Base Shape
Your two main choices are flat and convex.
A flat base is the industry standard. It creates a perfectly level coffee bed from edge to edge. We recommend this for most users, especially beginners. It provides the most consistent and predictable results once your tamping technique is solid.
A convex base has a slightly curved bottom. Supporters argue it helps compact grounds toward the puck edges, creating a better seal against the basket wall and reducing side channeling. However, it can make judging if your tamp is level harder.
3. Material and Weight
This is where personal preference plays a large role. A heavier tamper can feel more stable and do some work for you through its sheer mass. A lighter one might offer more tactile feedback and control.
Material (Base) | Pros | Cons | Best For |
Stainless Steel | Heavy, durable, easy to clean, food-safe | More expensive | Everyone; the gold standard for quality. |
Aluminum | Lightweight, affordable, often colorful | Can dent/scratch easily, less premium feel | Budget-conscious buyers or those who prefer a lighter tool. |
Plastic/Wood | Very cheap (plastic), aesthetic (wood) | Not recommended for base; lacks weight and durability. | Handles only. Avoid tampers with a plastic or wood base. |
4. Handle Ergonomics
The best handle fits your hand and promotes good tamping posture: a straight wrist and an elbow bent at 90 degrees.
Whether it’s a classic tall, rounded handle or a short-and-stout palm tamper, the goal is comfort and control.
If possible, try holding a few different styles in a store to see what feels most natural. A comfortable handle will make the process more enjoyable and repeatable.
How to Use a Tamper
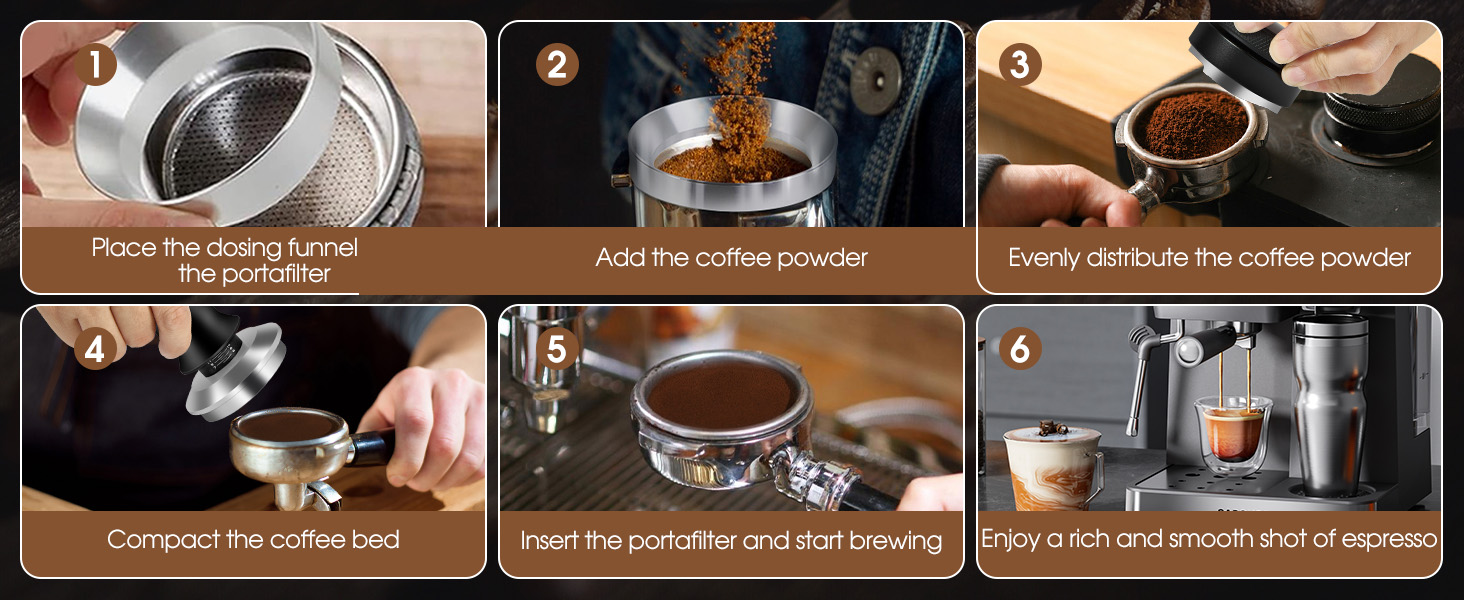
Now for the practical part. Here’s the step-by-step process for tamping your coffee to achieve perfect, even extraction.
1. Dose and Distribute
After grinding your coffee into the portafilter, the grounds will be in a messy, uneven mound. This is where you begin.
Use a WDT tool or similar puck rake to stir the grounds thoroughly. The goal is breaking up all clumps and creating a fluffy, evenly distributed bed of coffee. This step is arguably more important than tamping pressure itself.
Ensure your grounds are evenly spread from edge to edge, filling the basket uniformly. A consistent grind is essential. A good coffee grinder for espresso is a prerequisite for a good tamp.
2. Level the Grounds
Gently tap the portafilter side with your palm. Never use the metal tamper for this, as it can cause dents.
You can also give the portafilter a firm but gentle vertical tap on the counter. This helps grounds settle into a flat bed.
The coffee surface should be as level as possible before you introduce the tamper.
3. Position Your Body
Place the portafilter on a level, sturdy surface. A dedicated tamping mat is ideal as it protects your counter and the portafilter.
Place the tamper on top of the grounds. Use your fingertips to feel the rim and ensure the tamper is perfectly level.
Your grip should be comfortable but firm. Stand so your shoulder is directly above the portafilter, with your wrist straight and your elbow bent at about 90 degrees. This “piston” posture helps you apply pressure vertically, not at an angle.
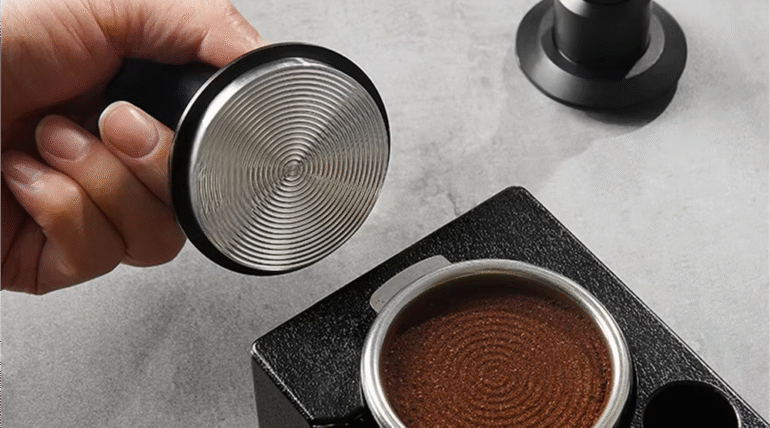
4. Apply Even Pressure
Press straight down firmly and consistently. You will feel the coffee grounds compress under pressure.
Continue pressing until the coffee bed feels solid and stops compressing. The goal is not hitting an exact weight but achieving full, consistent compression.
Pressure should be applied straight down from your shoulder, using your body weight rather than just arm strength.
5. The “Polish” (Optional)
After reaching full compression, some baristas perform a gentle “polishing” twist of the tamper on the puck surface.
We advise against this. Twisting can fracture the puck surface and dislodge grounds at the edges, creating micro-channels and increasing channeling risk.
A single, straight, vertical press is all you need. For more advanced techniques and analysis, resources like Barista Hustle provide in-depth articles on tamping variables.
6. Inspect Your Puck
Carefully remove the tamper by lifting it straight up.
The coffee puck surface should be smooth, flat, and perfectly level. There should be no visible cracks, fissures, or loose grounds. It should look clean and polished.
Now you’re ready to lock the portafilter into your machine and brew your perfect shot. You can be confident that you’ve done everything right in choosing and using your tool. This whole process is key when you choose a great coffee tamper.
Common Tamping Mistakes
Even with the right steps, problems can arise. Here’s how to troubleshoot the most common tamping issues.
Problem | Why It Happens | Solution |
An Uneven or Slanted Tamp | Applying pressure at an angle; wrist is bent; not standing directly over the portafilter. | Focus on your posture. Keep your wrist locked and straight. Use your body weight from the shoulder down, not just arm strength. A palm tamper can also help enforce a level tamp. |
Espresso Shot is Too Fast | Insufficient tamping pressure, or more likely, the grind is too coarse. | First, ensure you are tamping until the coffee is fully compressed. If the shot is still fast, **adjust your grinder to a finer setting**. This is the primary way to slow down your shot. |
Espresso Shot is Too Slow | Tamping too hard (less common), or more likely, the grind is too fine. | If your machine is choking, the first step is to **adjust your grinder to a coarser setting**. Don’t try to fix it by tamping lighter; consistent tamping is key. |
Cracks in the Puck | Tapping the portafilter after tamping; performing a “polishing” twist; lifting the tamper at an angle. | Never tap or knock the portafilter after you have tamped. This will shatter the puck’s integrity. Simply press down, lift straight up, and brew. |
Loose Grounds at the Edge | The tamper is too small for the basket, creating an untamped ring. | Measure your basket with a caliper and buy a precision tamper that fits snugly (e.g., 58.5mm for a 58mm basket). This is a very common issue with stock tampers. |
Care and Maintenance
A quality coffee tamper is a buy-it-for-life tool if cared for properly. Maintenance is simple and takes only a few seconds.
- Wipe It Clean: After each use, wipe the base with a soft, dry cloth to remove coffee oils and any stray grounds. This prevents old coffee from contaminating your next shot.
- Avoid the Dishwasher: Never put a tamper, especially one with a wood handle, in the dishwasher. High heat and harsh detergents can damage the finish, warp the wood, and ruin the tool.
- Inspect the Base: Periodically check the base for any nicks, dents, or deep scratches. A damaged base can create imperfections in the coffee puck, which can lead to channeling. If your tamper’s base is significantly damaged, it’s time for a replacement.
- Store It Safely: Don’t just toss it in a drawer with other metal utensils where it can get scratched and dented. Keep it on a tamping mat or in a dedicated spot on your coffee bar.
The Tamper's Role
The coffee tamper is far more than just a piston for pushing down grounds. It is a precision instrument for control, a tool for consistency, and a gateway to unlocking the nuanced flavors hidden within your coffee beans.
By understanding what a coffee tamper is and how to use it, and by selecting the perfect size and material, you now have the knowledge to make this crucial step a deliberate and effective part of your brewing ritual.
Mastering the tamp is a fundamental skill in the art of espresso. By creating a dense, level, and uniform puck, you set the stage for a beautiful extraction every single time.
Embrace the process, pay attention to the details, and you will be rewarded with consistently delicious espresso that rivals your favorite café.
As a professional manufacturer specializing in the research, development, and production of coffee machines, we not only offer a diverse product selection but also support OEM/ODM customization to meet the needs of diverse markets and customers. With consistent quality control, fast delivery, and innovative designs, our coffee machines are used by numerous brands and channels worldwide. Whether you're a distributor, wholesaler, or brand owner, we can provide you with reliable solutions to help you grow your business. Contact us to explore potential collaboration opportunities.

Facebook
Twitter
LinkedIn
WhatsApp
Categories: Buying/Customization Guide Product Knowledge